Wrike Integrationについての考察【後編】
優れたAPI設計を持ち、高度なワークフローアプリケーションを作成するための非常に強力なメソッドセットを兼ね備えたWrike。
弊社バングラデシュのエンジニアチームが、以下の3つの視点からWrike Integrationについての考察を行いました。
後編は、Workatoを利用したWrike Integrationについてお伝えします。
尚、正確性を逸しないために英語原文のまま掲載いたします。ご了承ください。
※日本語版はこちらのページより無料でダウンロードしていただけます。
前編についてはこちらからぜひご覧ください。
- WrikeをBaaS(Backend as a Service)として活用することは可能か?
WrikeをBaasとして使用するためのtodoアプリによる検証。
- Wrikeと他のワークフローアプリケーションを連携するには?
日本語翻訳ボット作成による検証。タスク・プロジェクトの会話セクションにコメントがあった際に自動翻訳して投稿。
【後編】
- Workatoを利用してWrikeと他のワークフローアプリケーションを連携させるには?
ワークフローの進捗時(例:ステータスがAからBに変更)に電子メールによる自動通知を行う。
- Dialogflowを使用してWrike上にタスクを作成するチャットボットを作成することは可能か?
SlackのワークスペースからWrike上にタスクを作成する。
Wrike Workato connector
Wrike offers Wrike Integrate by Workato, so we wanted to do our Japanese Translation Bot and Email Notifier with Workato.
For that, first we needed to do our research on Workato. Through our research on Workato, it turned out, it’s a great tool for any business to automate business workflows across cloud applications like salesforce, slack, google platform, you name it! – It’s like many superheroes in the same movie – the Avengers!
Workato
Workato allows you to feed or integrate data from one business application say Wrike to another business application say Slack! – filling the information gaps between tools a business uses on a daily basis. You can connect multiple applications building a Workato recipe to achieve your business workflow goal.
Workato Concepts
Recipe – a recipe is the action-flow you build using Workato to fill the gap between multiple applications.
Triggers – a trigger is an event in one application that you want to know from another application.
Steps – Recipes are designed in steps – (step 1) trigger, (step 2) do something about trigger data in step 1, (step 3) another action – publish the output from step 2. Workato steps can be actions, conditional actions, list actions, actions that call other recipes, try/catch, etc.
Actions, – you can think of actions as lines of code that do something with the data from the trigger or previous action output.
Continue reading about Workato concepts.
Workato Connectors

A custom connector showing the defined code blocks
A connector is a set of code that exposes an interface to your application, for other connectors to connect with, in a recipe. Workato has tons of publicly available connectors for most of the business applications people generally use on their day to day professional work. But you can still build your own connector. Generally you won’t need a custom connector. If you are working with an application that is not already in the workato space, most probably you can use the HTTP connector to connect with your backend application. But if the HTTP connector is not enough, you can create your own custom connector. Workato has Connector SDK for you to build your custom connector in Ruby.
Wrike Workato connector for our translation bot
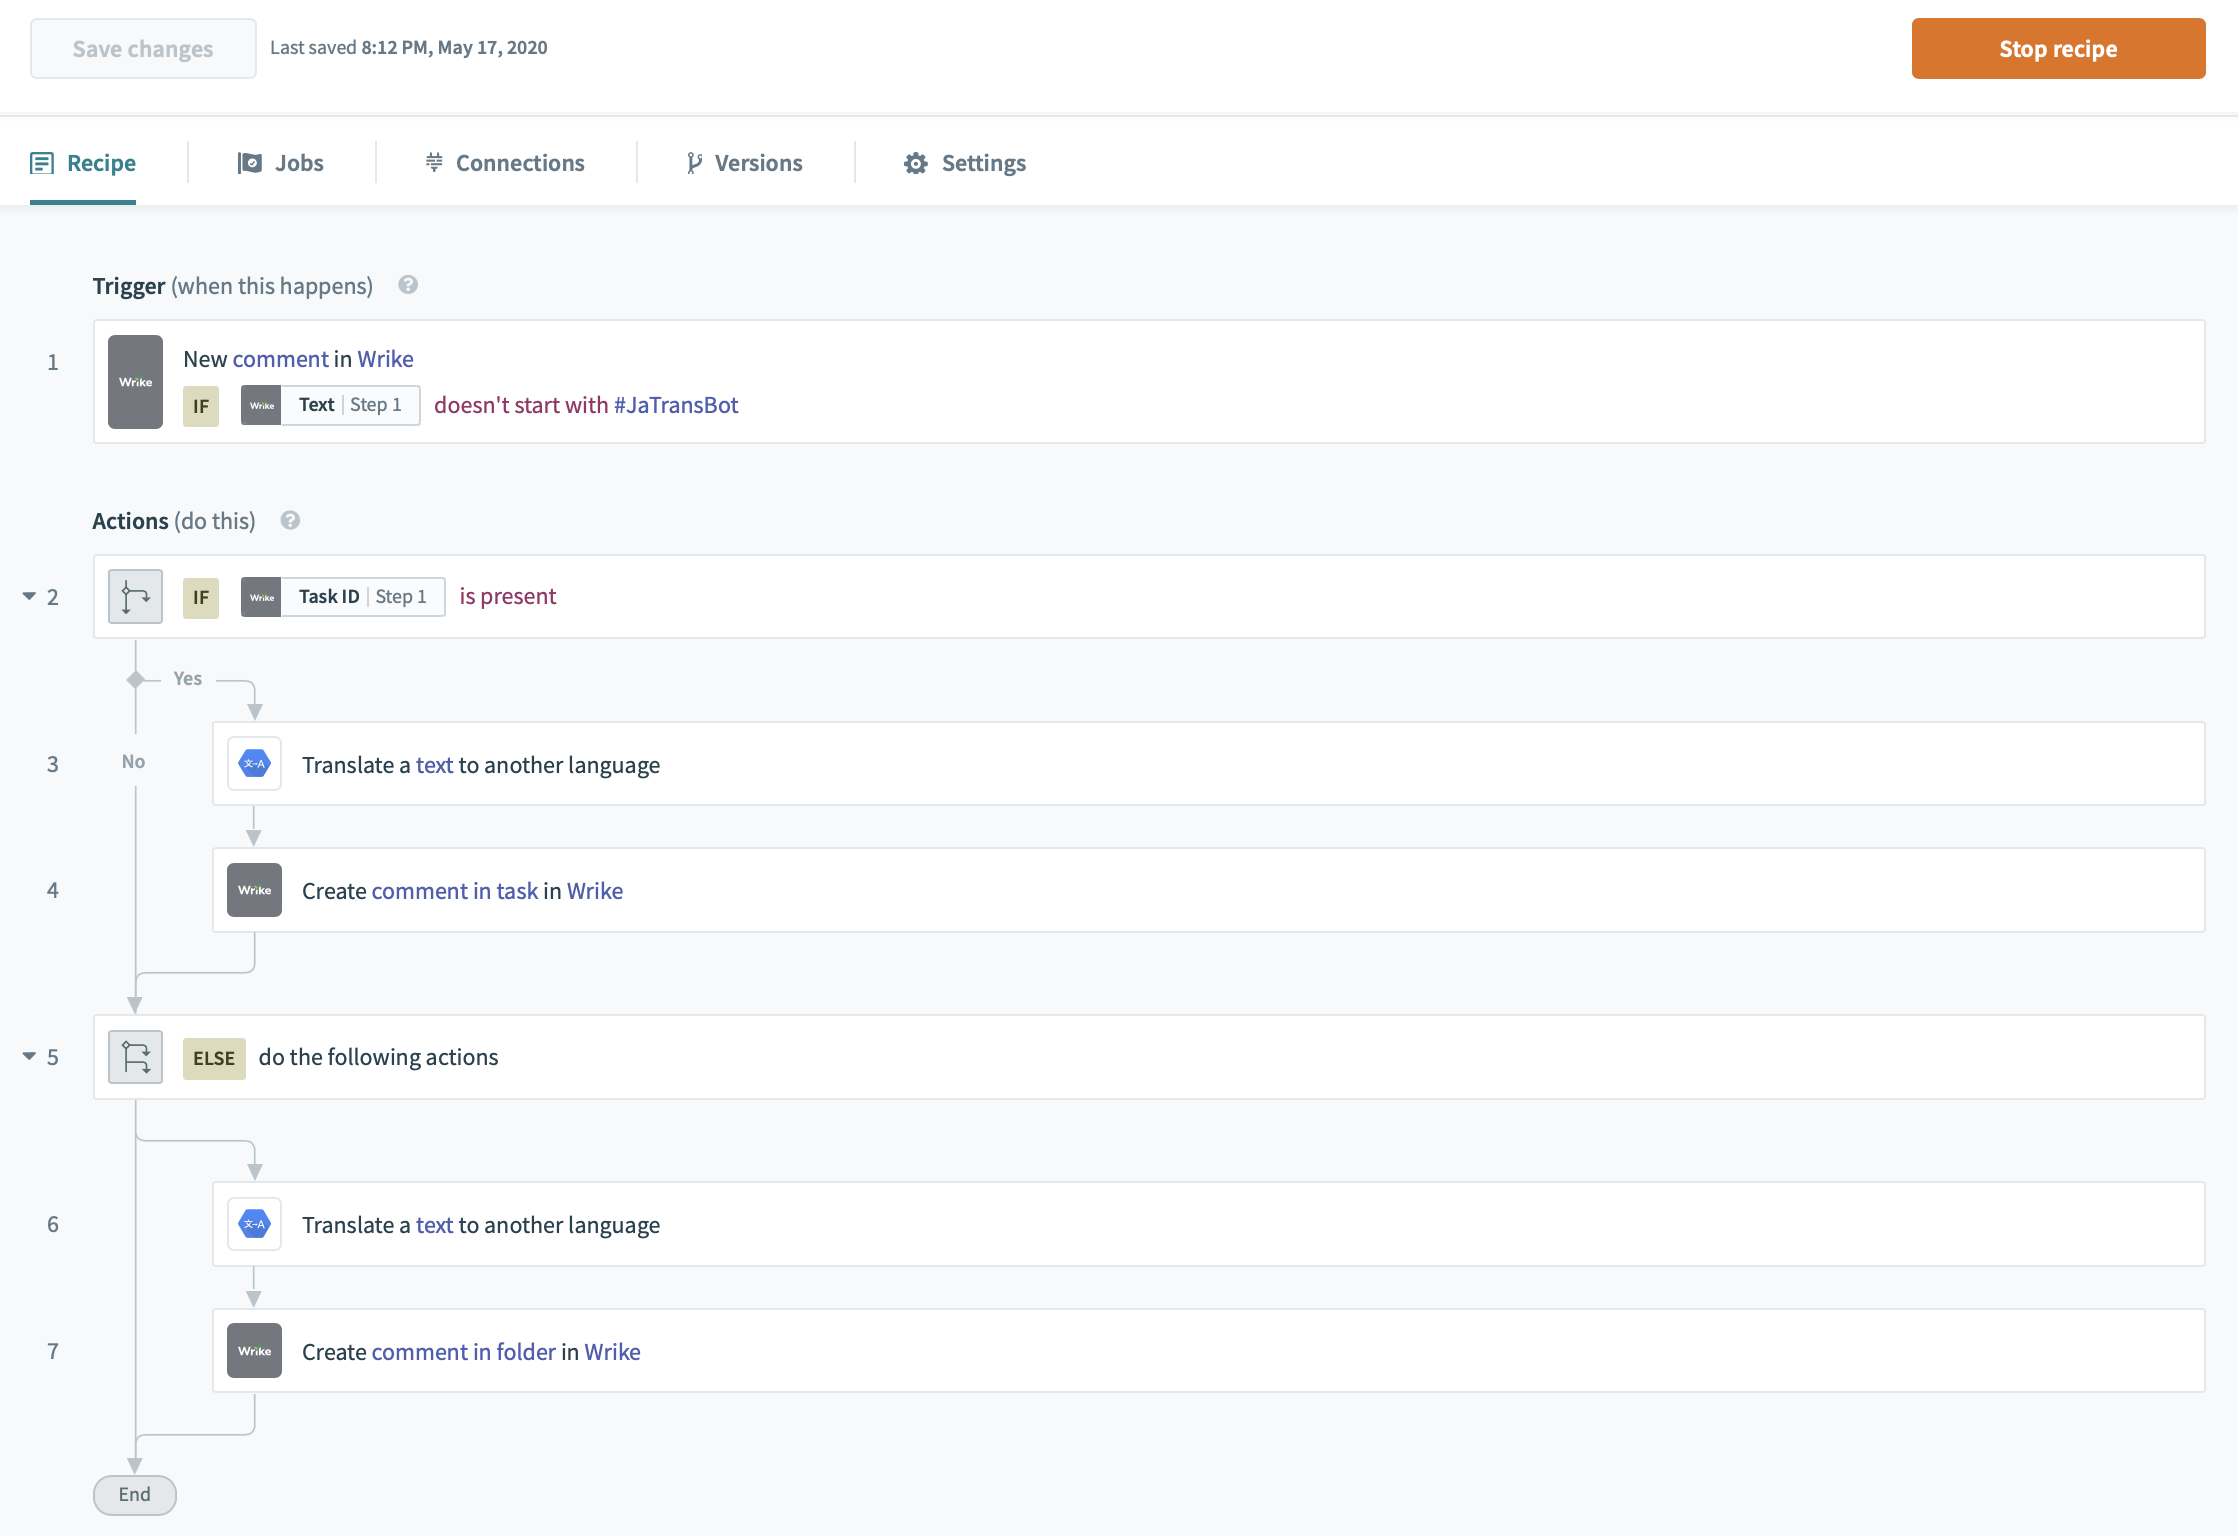
Snapshot of our translation bot COMPLETE recipe
Wrike workato connector has lots of triggers and actions for you to connect with your application. We used the new comment trigger event and Create comment in task / folder actions. We fed the new comment trigger event into Google Translate connector/app to translate the new comment text. And then we fed the translated text from Google Translate app output into the Wrike app again, using it to create a new translated comment.
Phase #01: Select and prepare trigger event
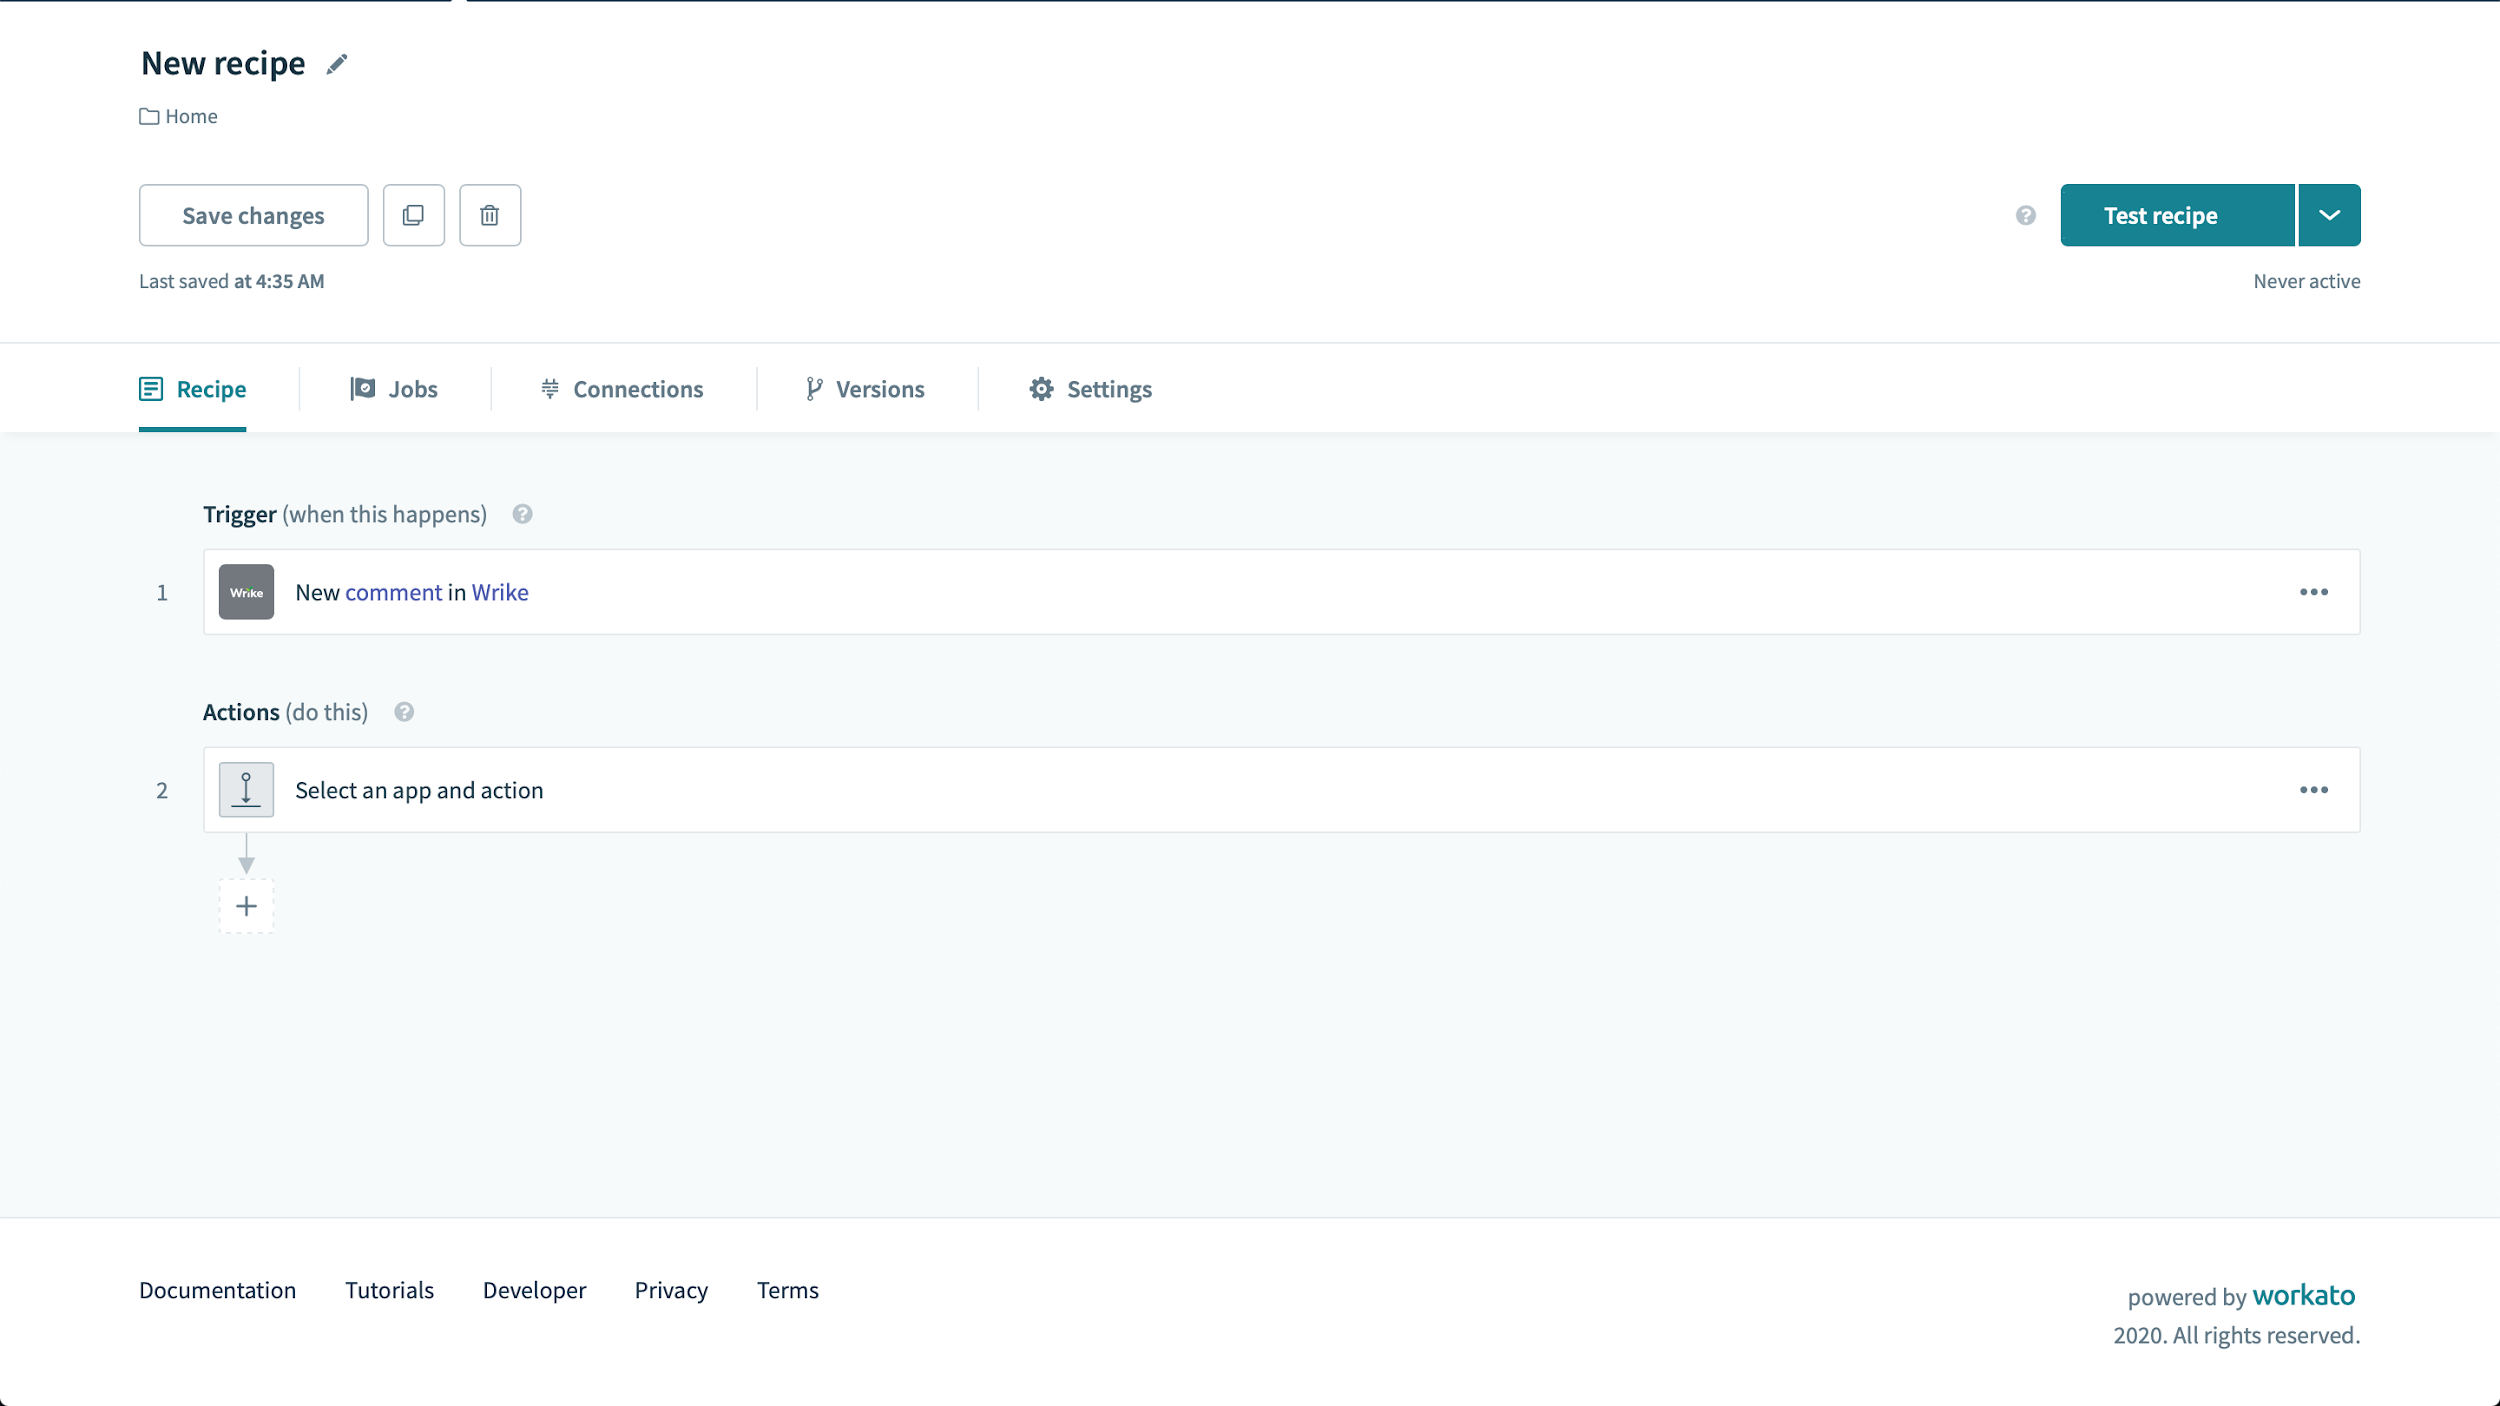
#01: From your Workato account, first go to Recipes, and click Create a new recipe.
#02: Search and click to select Wrike from the App selection dropdown.
#03: Search and click to select New Comment from Trigger event dropdown.

Using Wrike App in your recipe
#04: Click Next to go to next step: Link your Wrike account
#05: Give a Connection name, default is My Wrike account (ignore Advanced settings for now)
#06: Click Link your account to authenticate and link your Wrike account
#07: Click Next and keep everything as it is on the next page, and click I’m an expert. Skip > button at the bottom.
#08: Now we are on the advanced recipe setup page, give your recipe a name at the top left.
Phase #02: Trigger condition
At this moment, you have an unfinished recipe created for you, with only the trigger event defined.
Using Wrike Comment event as a trigger in your recipe
#01: Click to expand the New comment in Wrike trigger action
#02: Scroll down and toggle to enable Trigger condition switch
#03: For Trigger data, Select App data > New comment > Text
#04: For Condition, Search and click to select doesn’t start with
#05: For Value, we used #OurAppName (you can use your own #AppName)
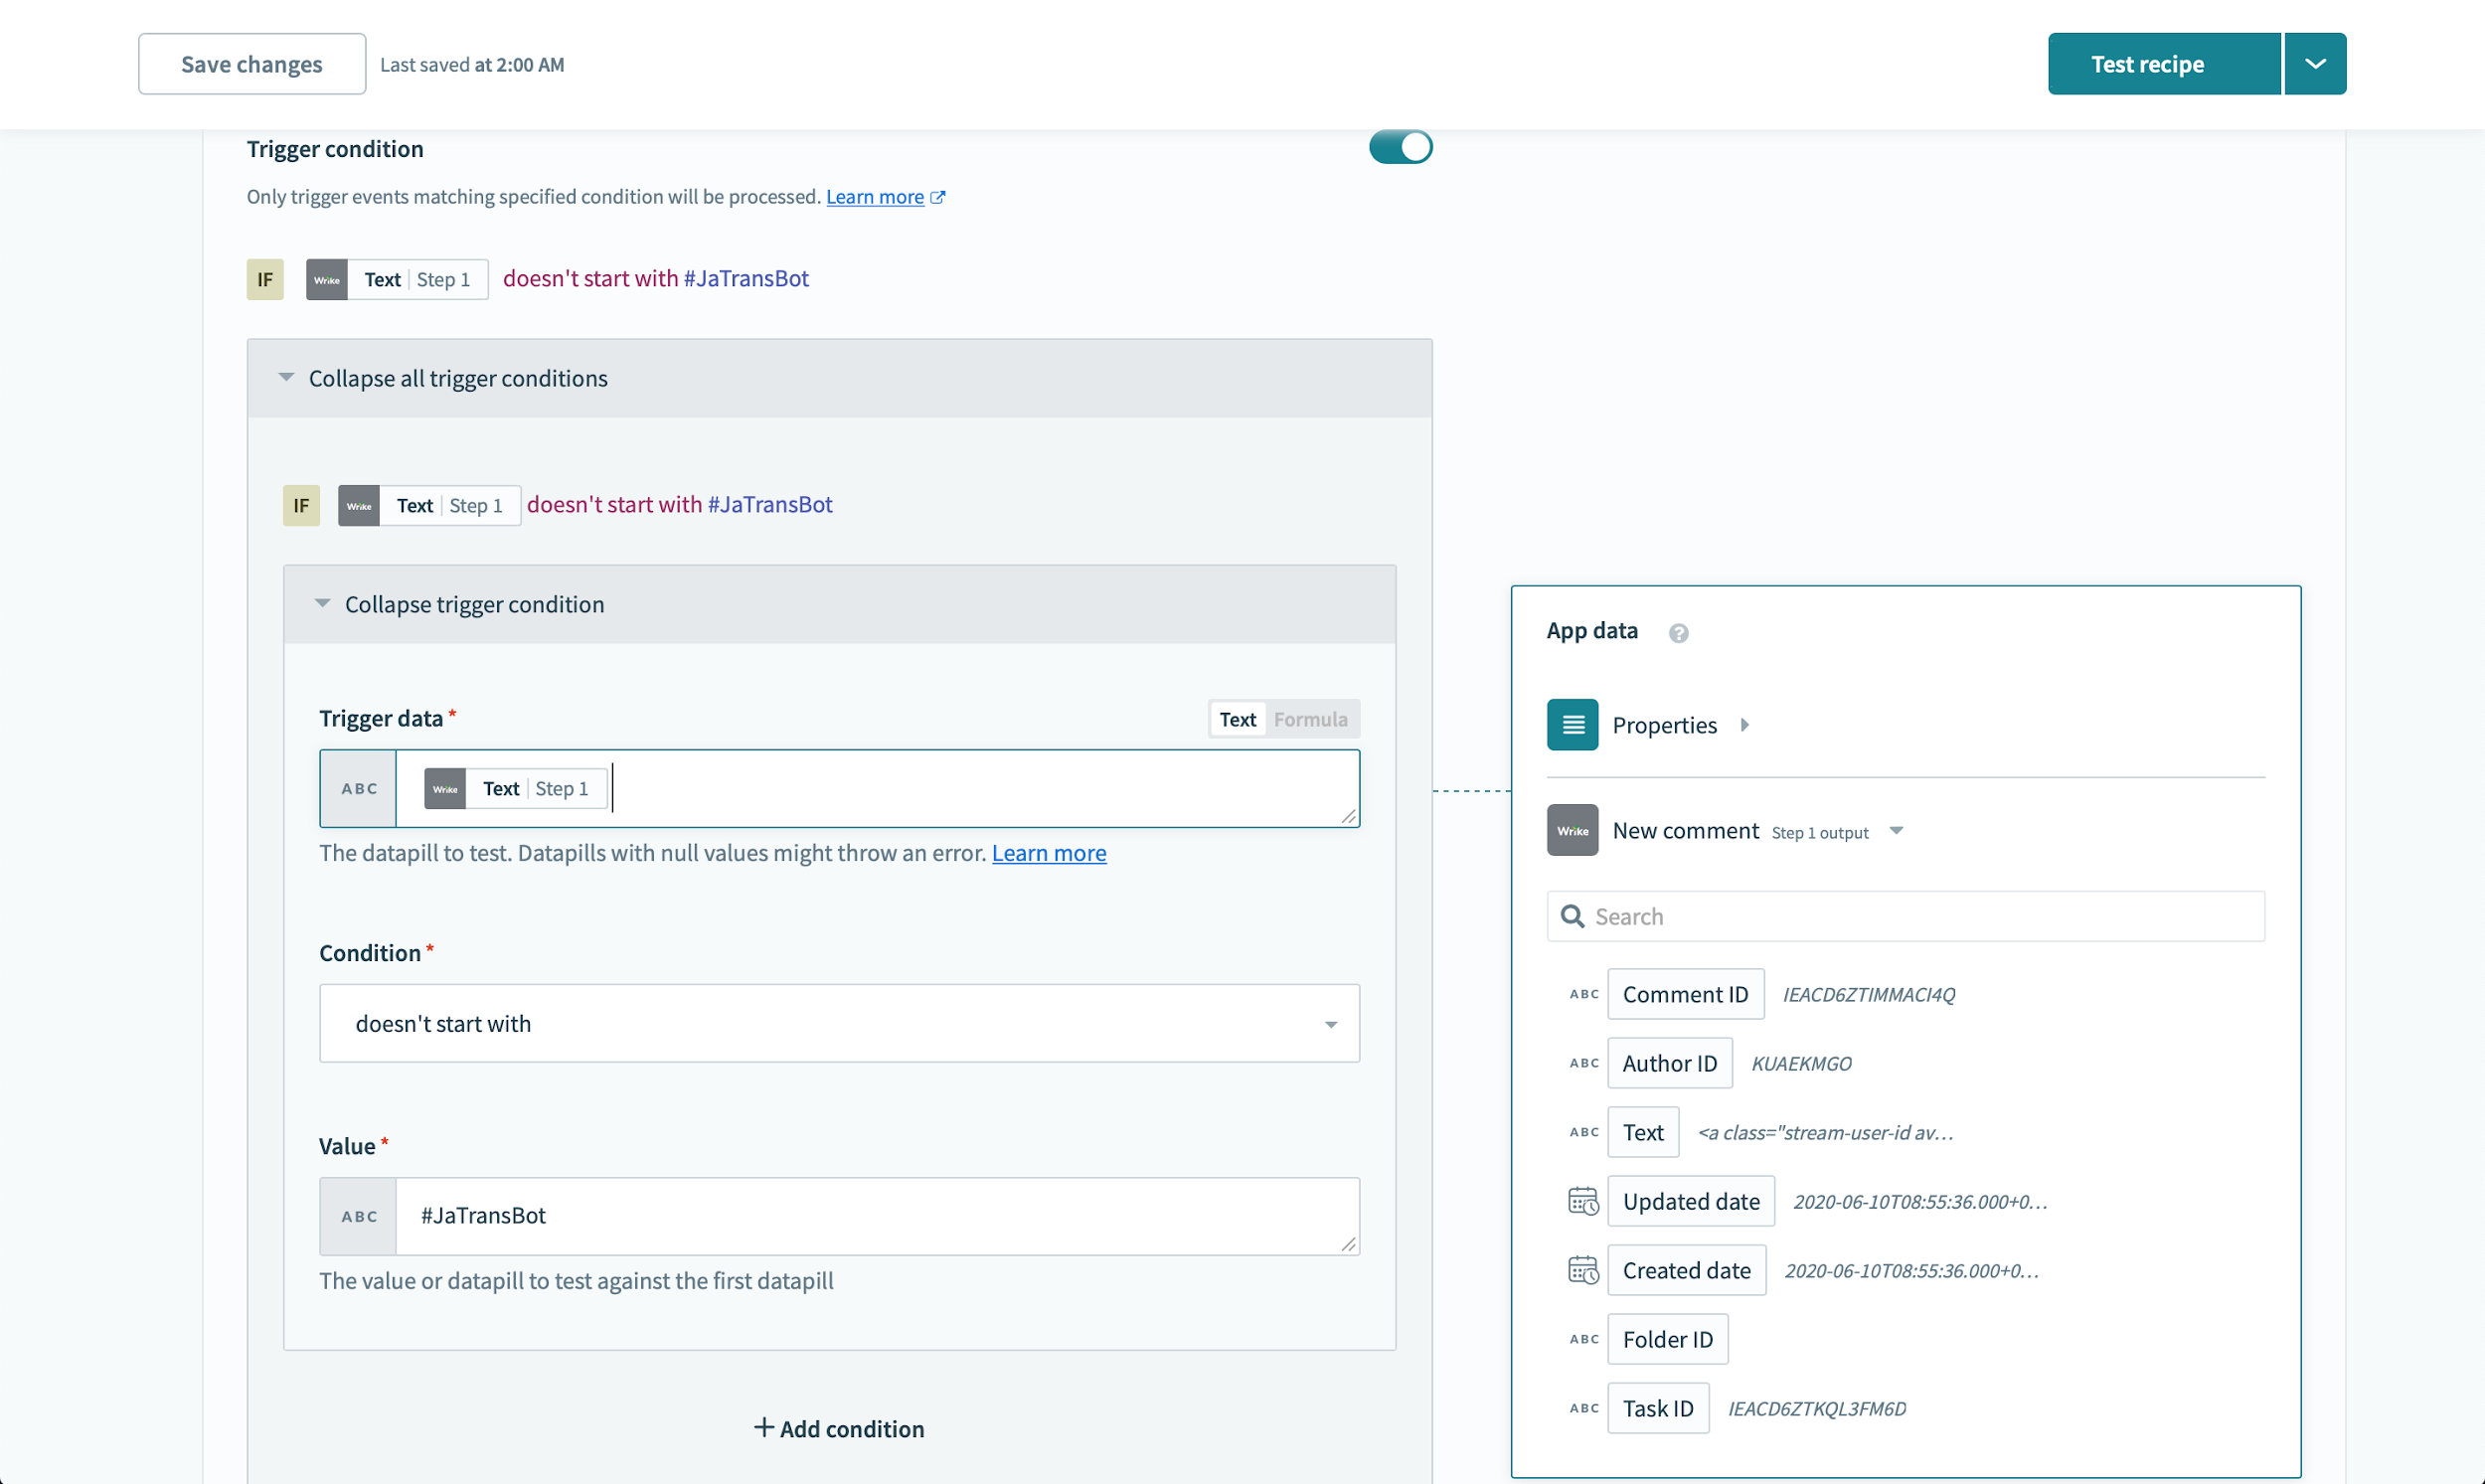
Defining the Wrike Comment trigger condition
Now our trigger event is all set. Now we move to the next phase – defining the conditions and actions.
Phase #03: Defining the conditions
#01: Click the control button on the right side of Select an app and action, and select Delete step
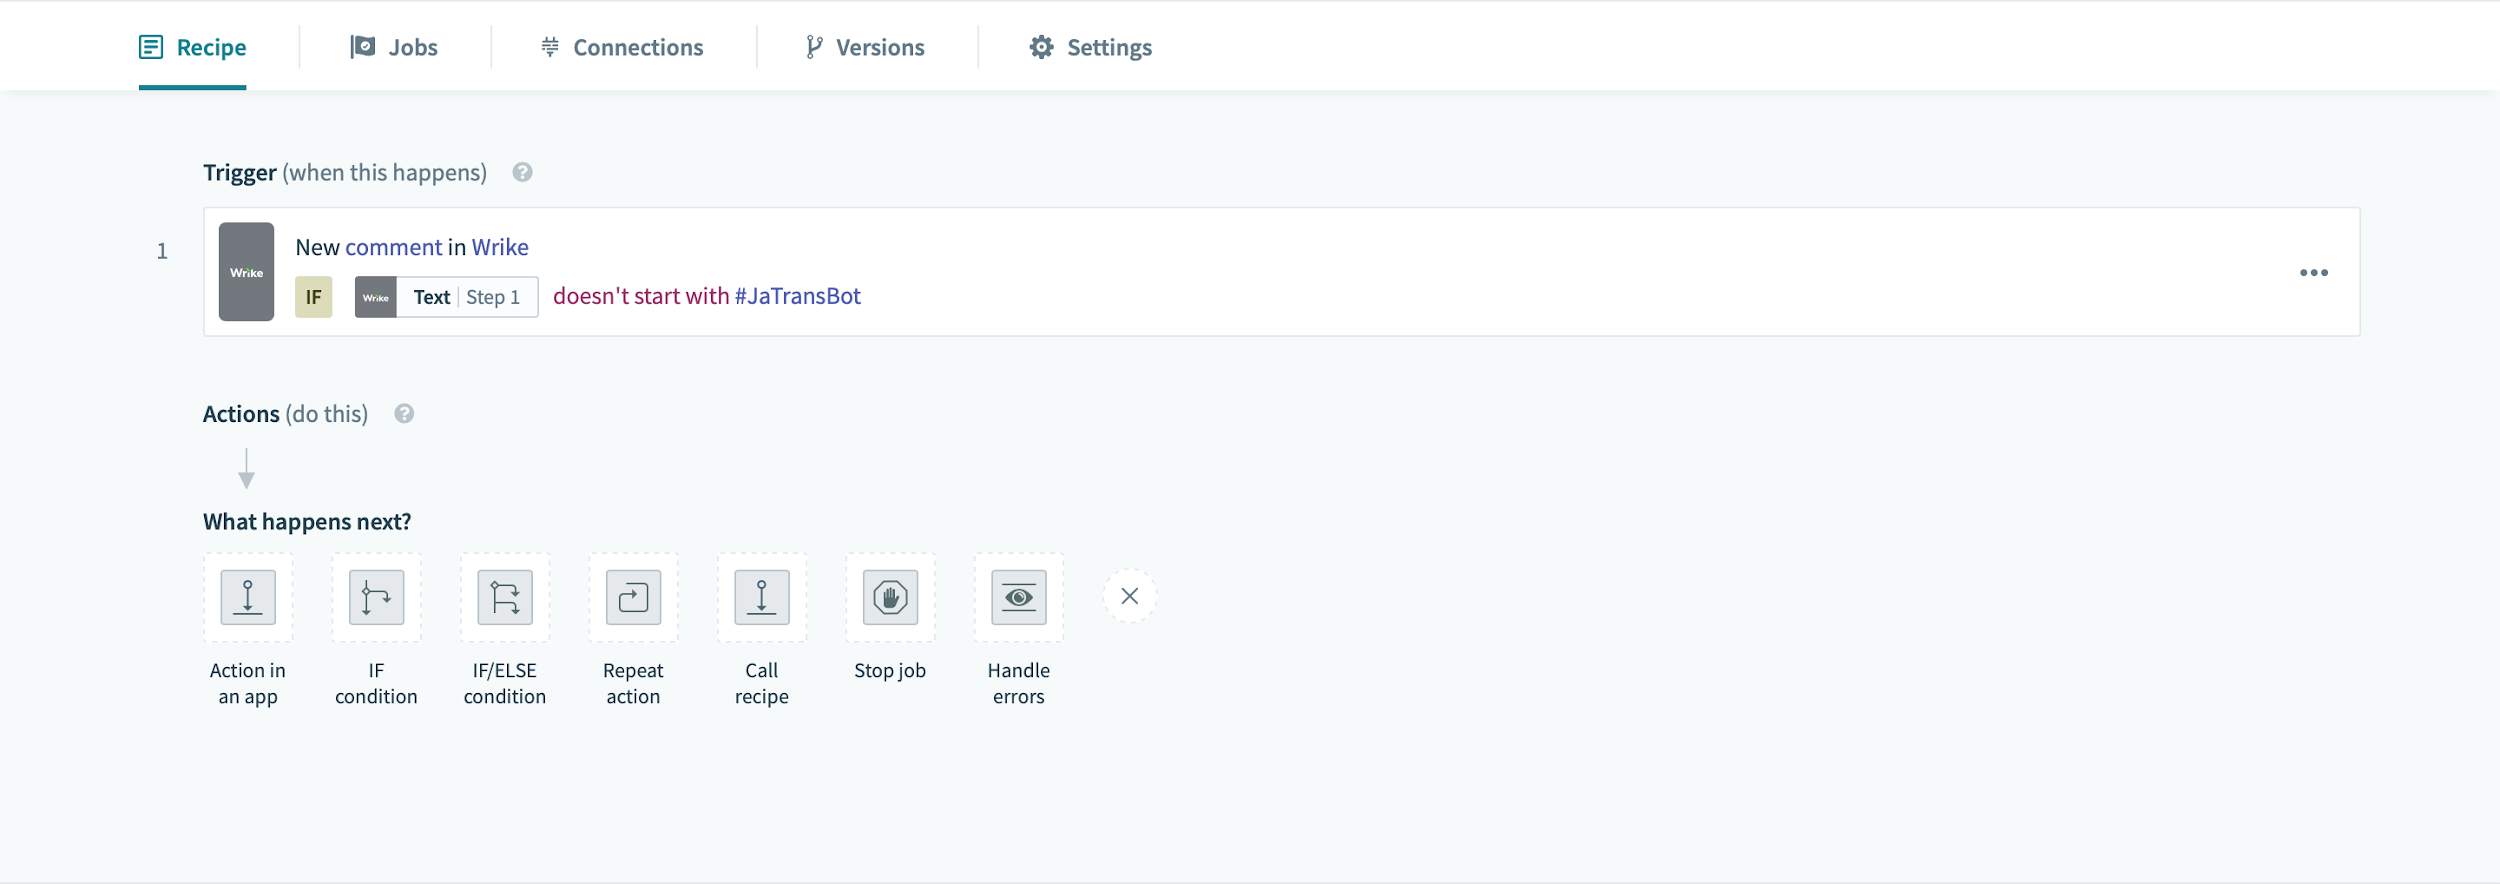
#02: Click the [+] button under the actions, and select IF/ELSE condition
#03: Click Setup your condition on step recipe step 2
#04: For Data field, select App data > New comment > Task ID
#05: For Condition, Search and click to select is present
Phase #04: Select and prepare translation action
#01: On recipe step 3, under the Recipe Actions, under the if condition, click Select and app and action to do when condition is met
#02: Search and click to select Google Translate from the App selection dropdown.
#03: Click to select Translate text from Action dropdown.
#04: Link your google account following steps similar to #05 and #06
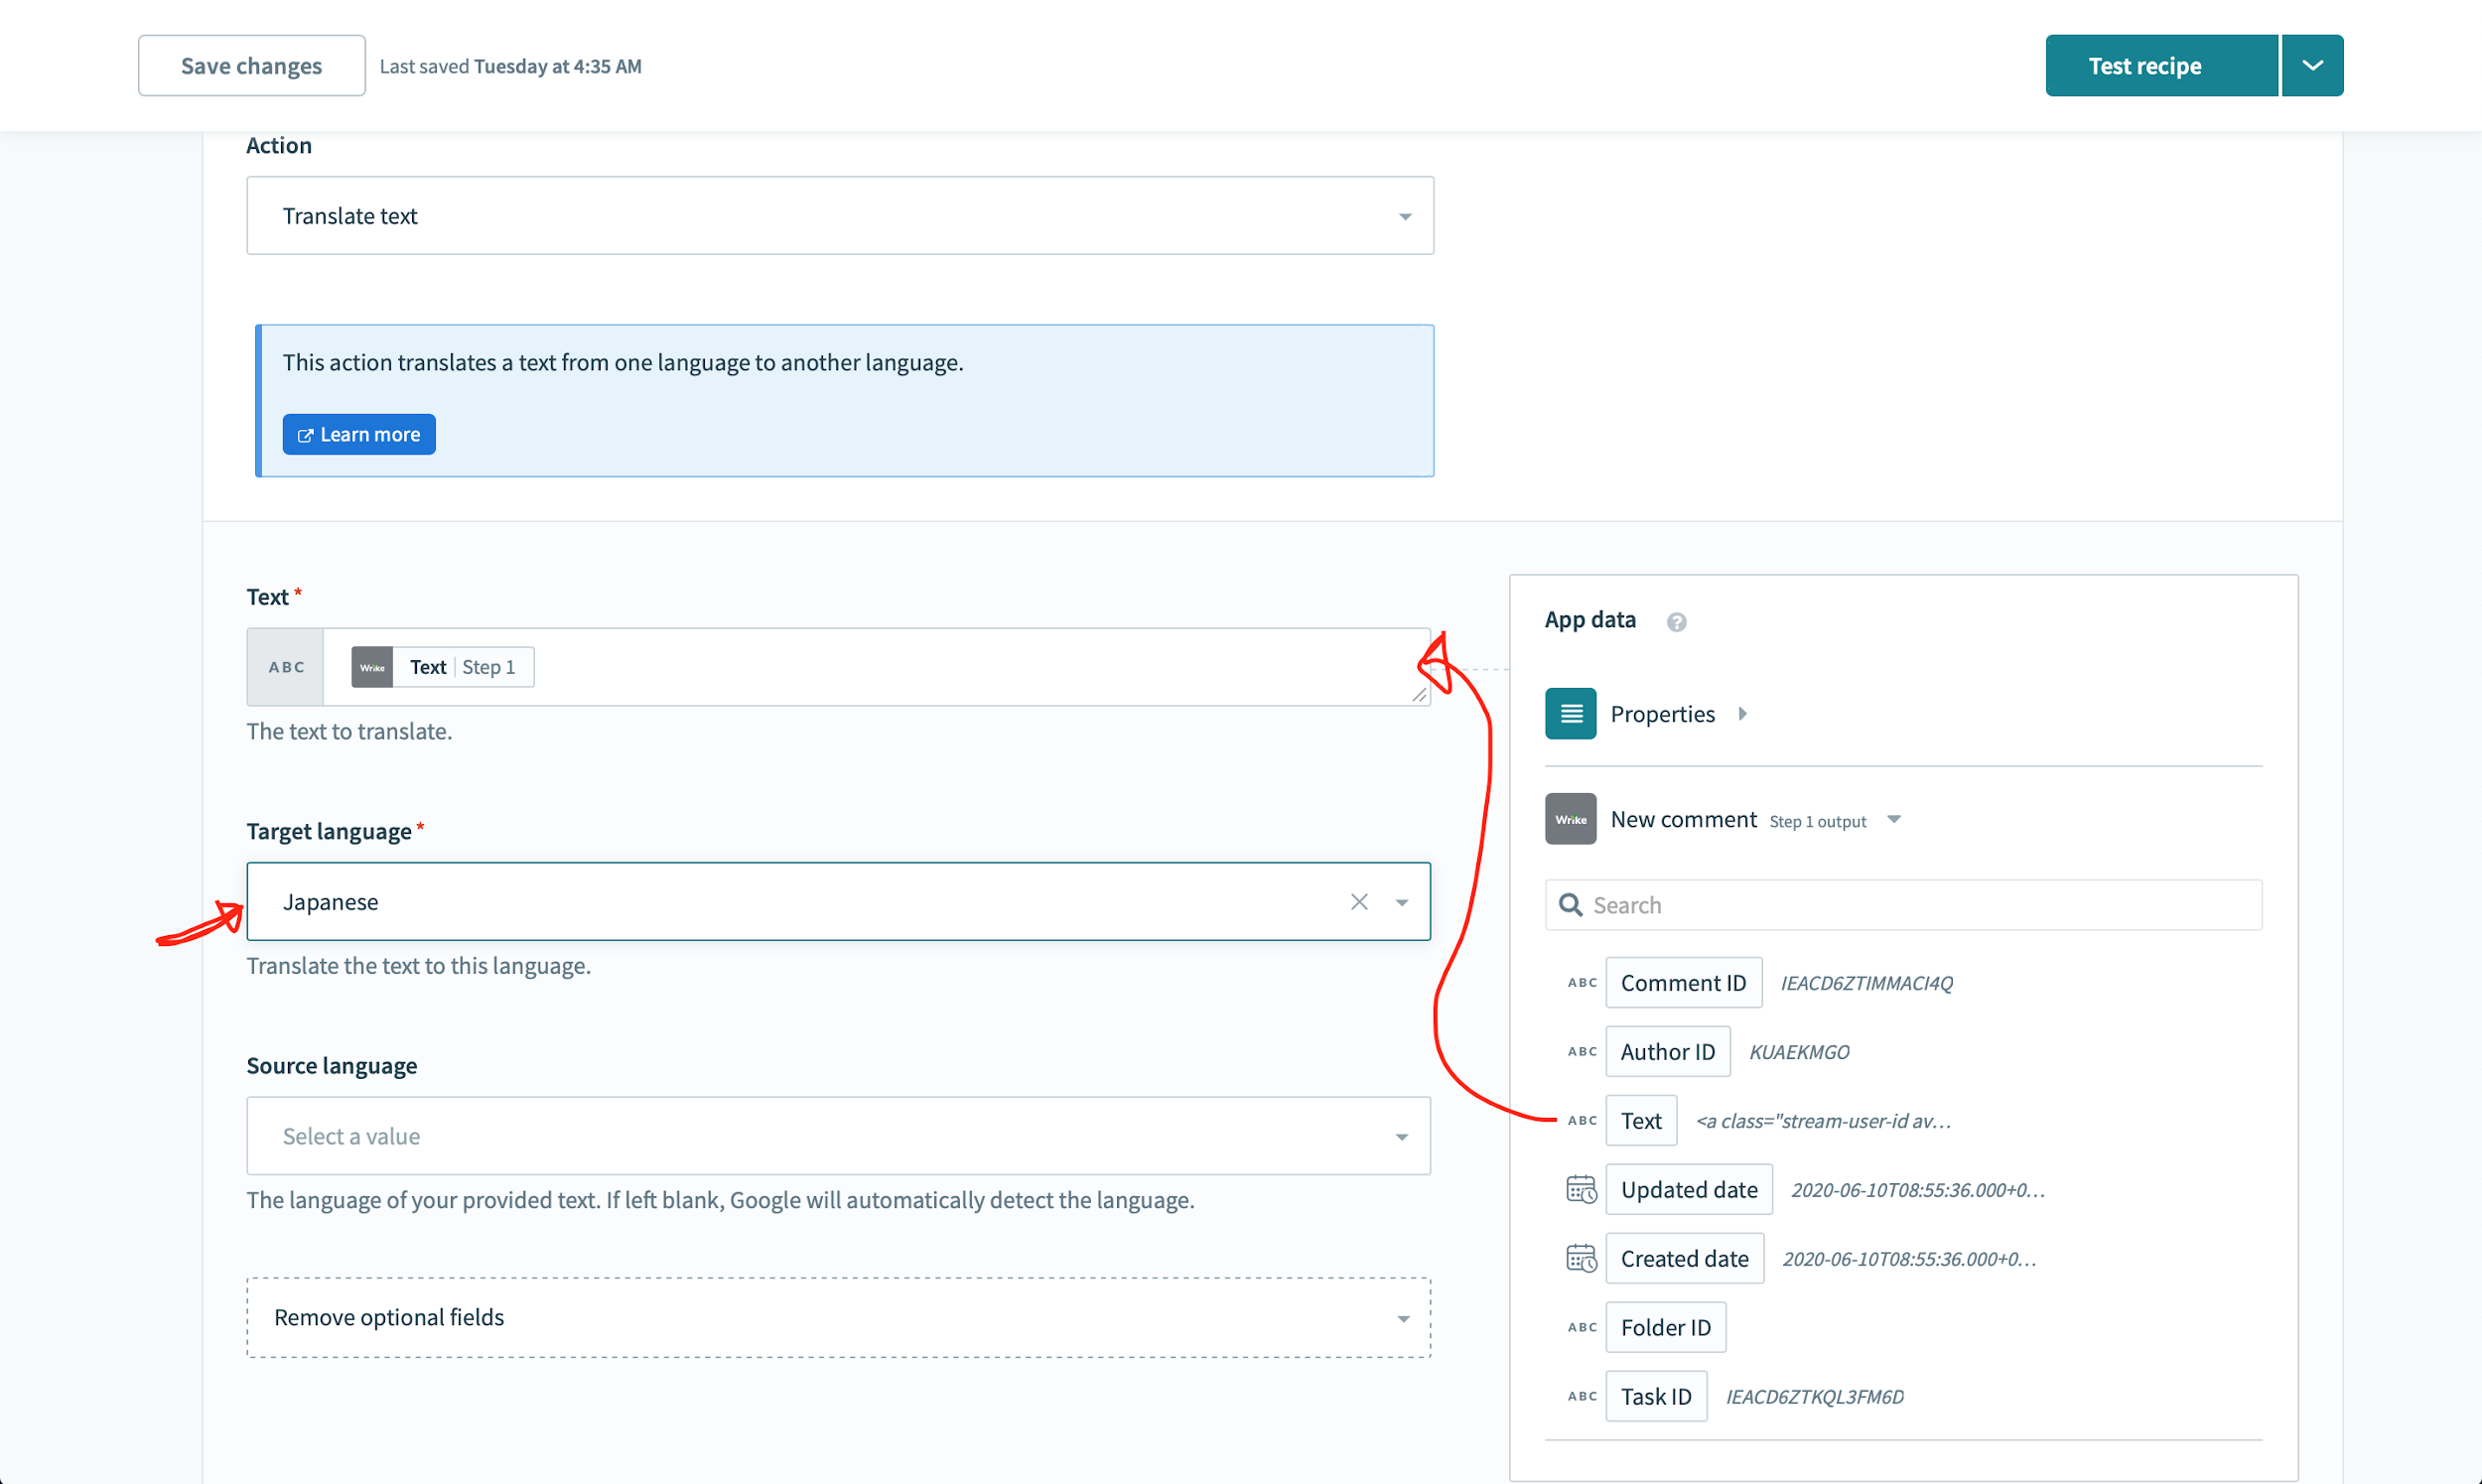
#05: Set Text to App data > New comment (step 1 output) > Text
#06: And select Japanese (or your desired language) as Target language.
#07: On recipe step 5, under the else condition, repeat steps #02 to #06.
Setting up Google Translate app action for new comment text translation to Japanese
#08: Under the recipe step 3, hover and click the [+] button and select Action in an app
#09: Search and click to select Wrike from the App selection dropdown.
#10: Search and click to select Create comment in task from action dropdown.
#11: For Task ID, select App data > New comment (step 1 output) > Task ID
#12: For Comment, do something like below with App data > Translated text (step 3 output) > Translated text

New comment in task
#13: For Comment, do something like below with App data > Translated text (step 3 output) > Translated text
#14: Under recipe now step 6, under the else condition, repeat steps #08 to #13
- except on #10 select Create comment in folder
- On #11, for Folder ID, Select Enter a folder ID, and set value App data > New comment (step 1 output) > Folder ID
- On #13, use App data > Translated text (step 6 output) > Translated text
That’s it! Congratulations! You have created your first functional Workato recipe. Now you need to test your recipe and see if it works right.
Phase #05: Test your recipe
#01: On the top right of the recipe window, you will find the Test recipe button
#02: First make a new comment in a task or a folder in your Wrike account
#03: Then click the Test recipe button, this will take you to the recipe Jobs tab, show the progress status of your last comment translation job. If all goes well, you will see the job listed in the jobs table.
#04: Go back to the task or folder you commented and check if you’ve got the translation comment.
Phase #06: Debugging
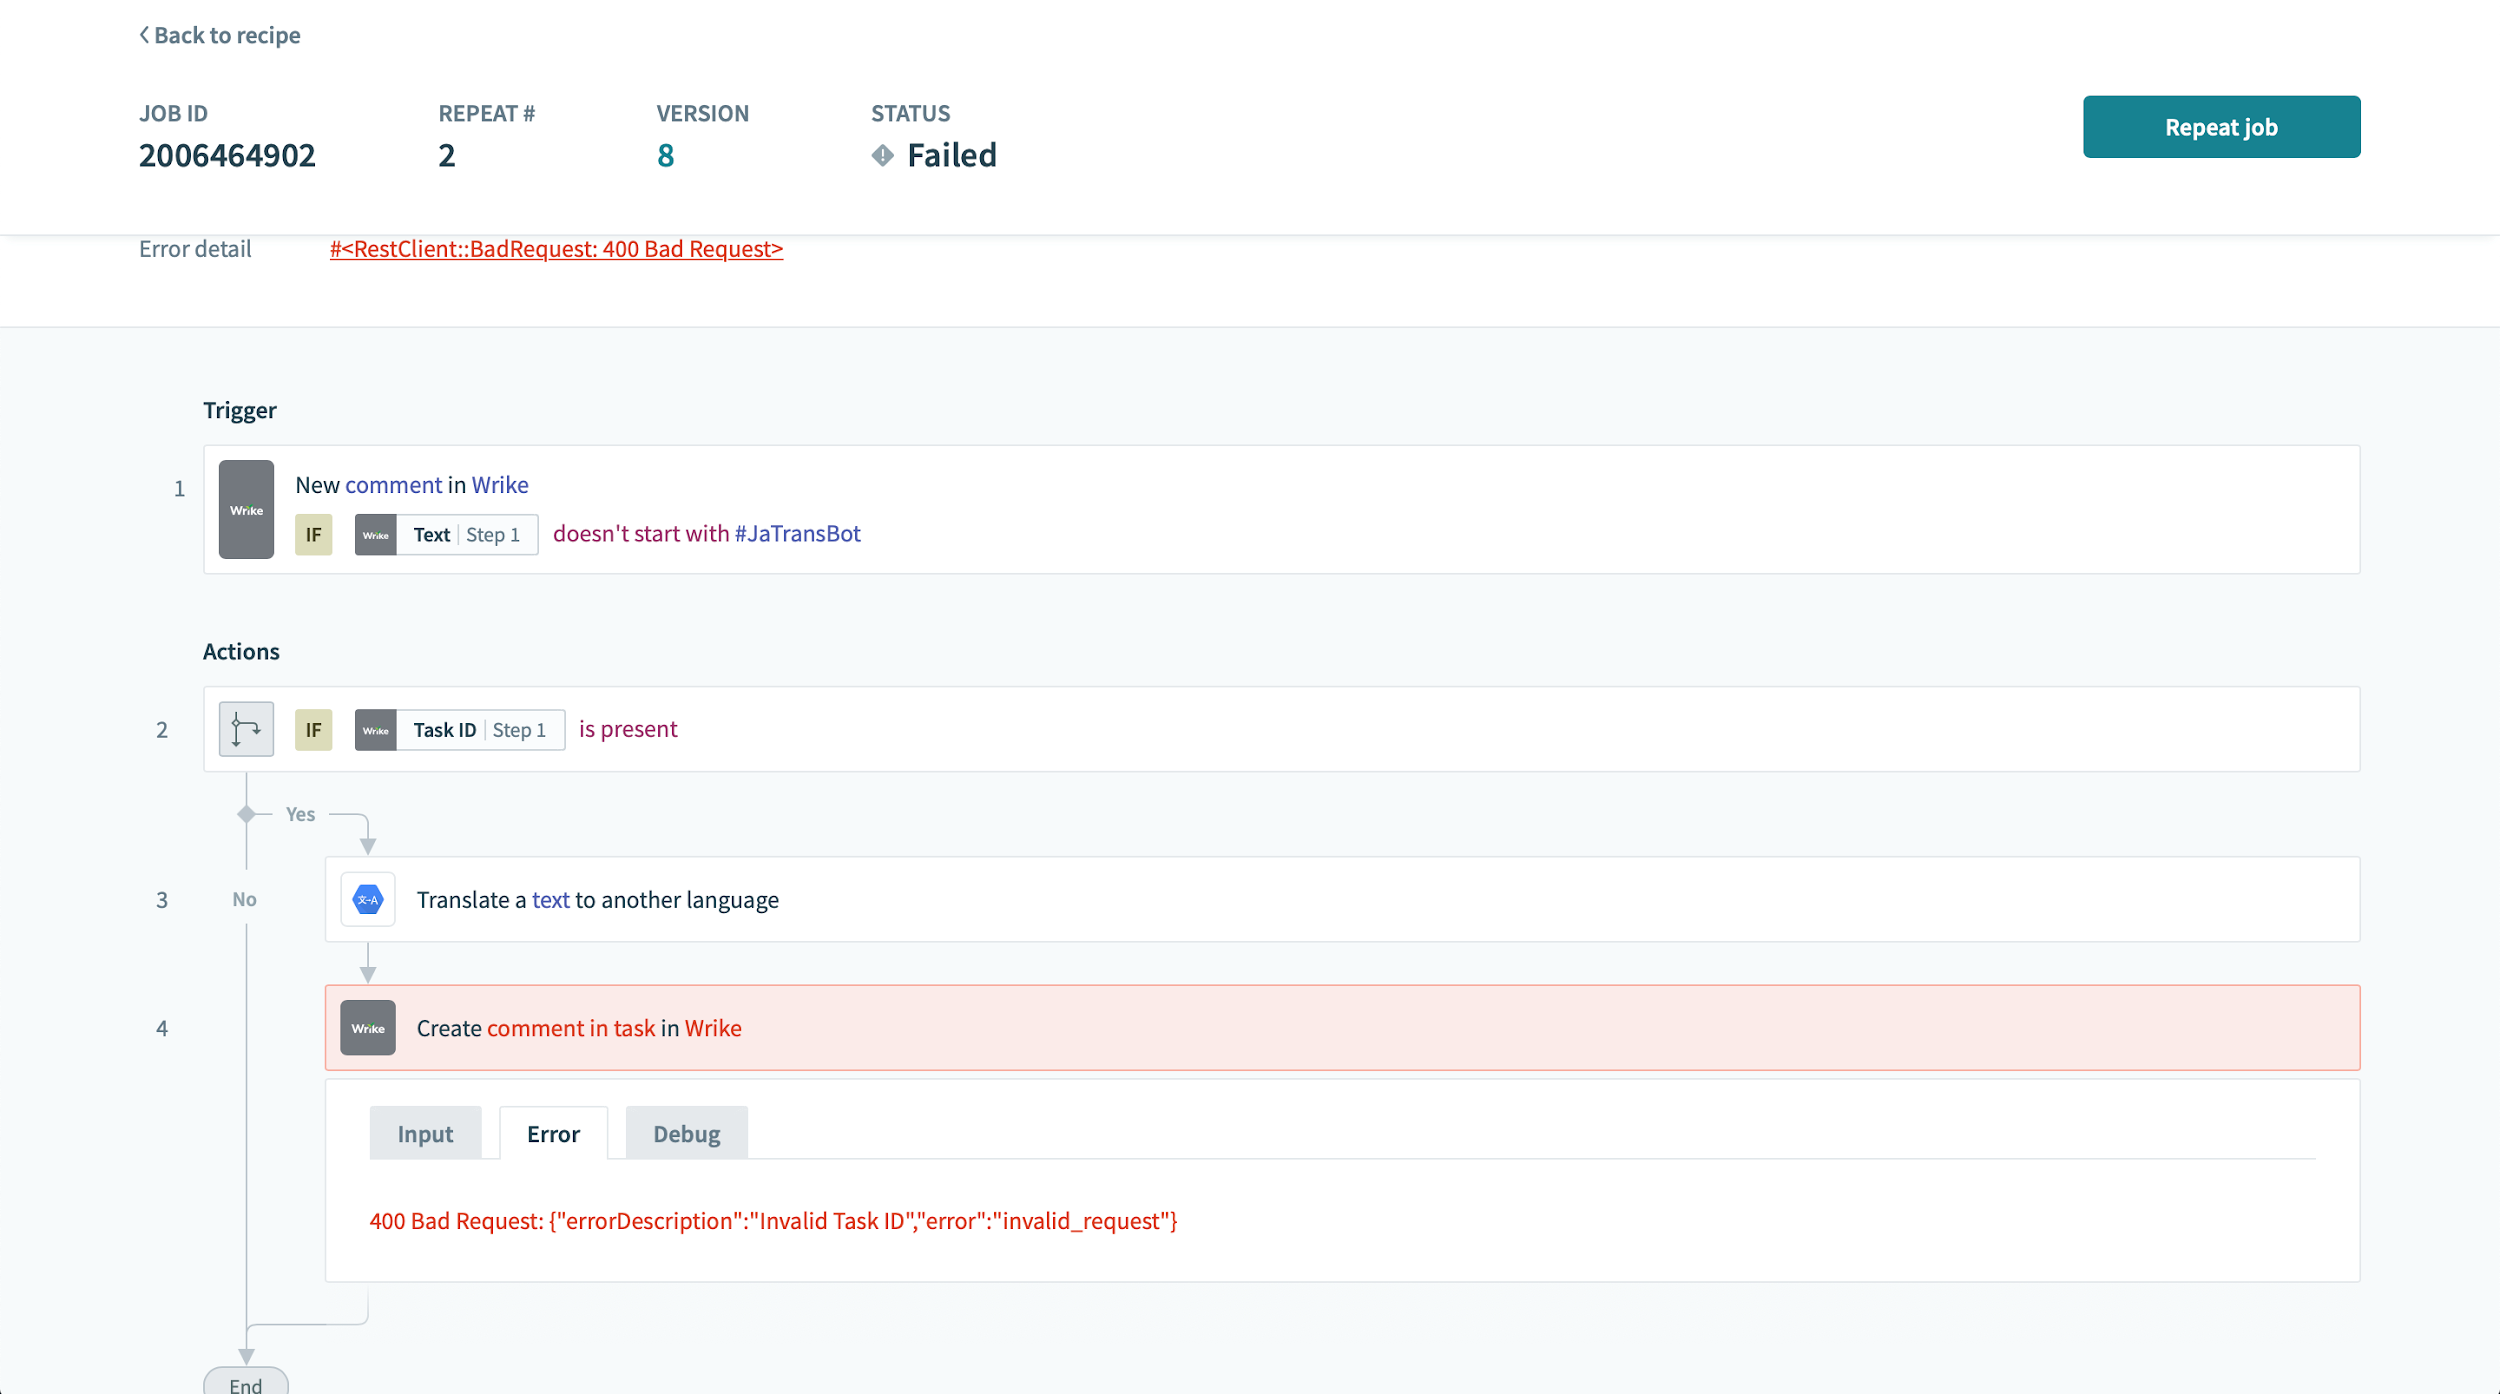
If you see a job is failed, you can click on the job and see the flow of actions and where and what is the specific error.
Issues we faced with Wrike Workato connector
If you’ve noticed, the comments you make in Wrike do not immediately get processed. There are two types of trigger events, polling and real time. Unfortunately, the new comment trigger event is not real-time, so the bot response requires up to 5 min (wait time until next update) to get processed. Also the event loop persists. We also did not find the same data that we found in the webhook event, that was a loss – html format comment data.
Workato custom connector for email notifier
As we now understand the basics of Workato connectors, triggers and actions, we wanted to build our first custom connector. Our project is an email notifier → that notifies an intended recipient through email, when a task has progressed in the workflow from one status to the next status (e.g, from status A → to status B).
Wrike workflows
Let us first understand Wrike workflows. In Wrike you can create custom workflows with strictly defined allowed transitions from one status to another, but not others.
For example, We have
→ Lists: List A, List B, Complete
→ Allowed transitions:
→ From List A to List B, not reverse
→ From List B to Complete, not reverse
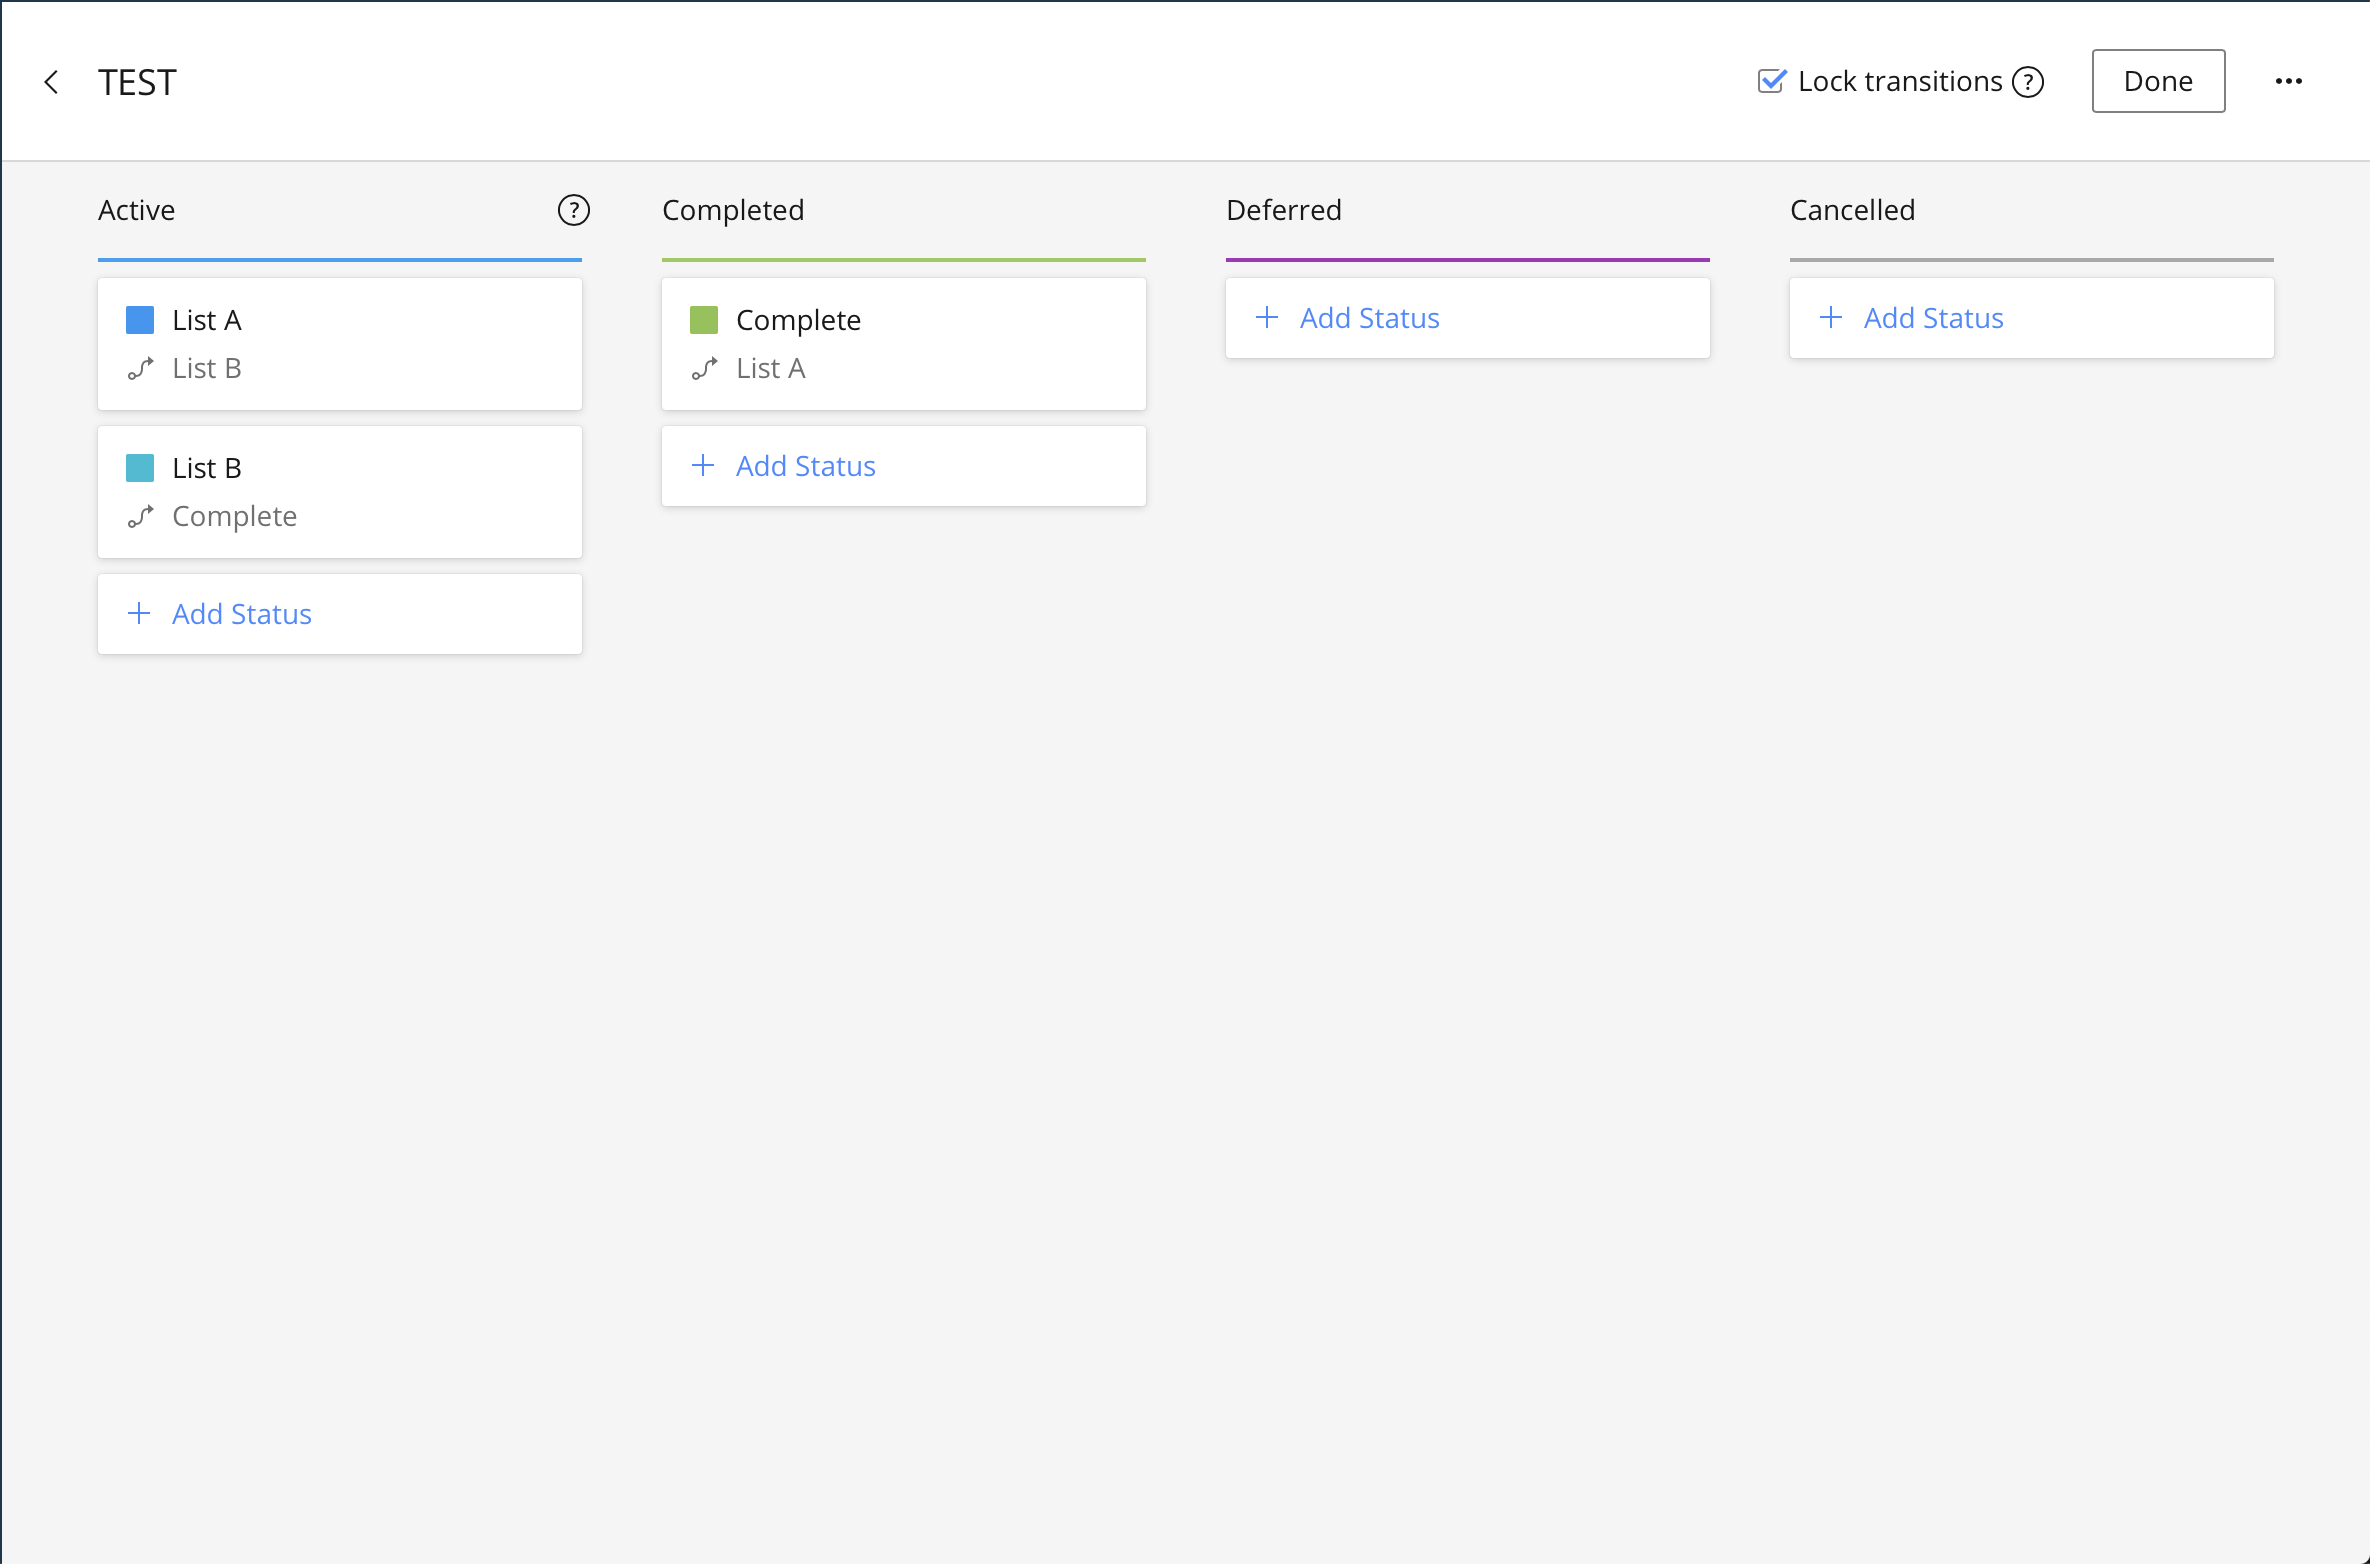
Our workflow for our email notifier app
Custom fields
Now, for the purposes of our email notifier app, we need to store the intended recipient’s email address for a task, for that to be used later when we are sending the email notification. Wrike allows you to define your own custom fields, and add it to your tasks table.
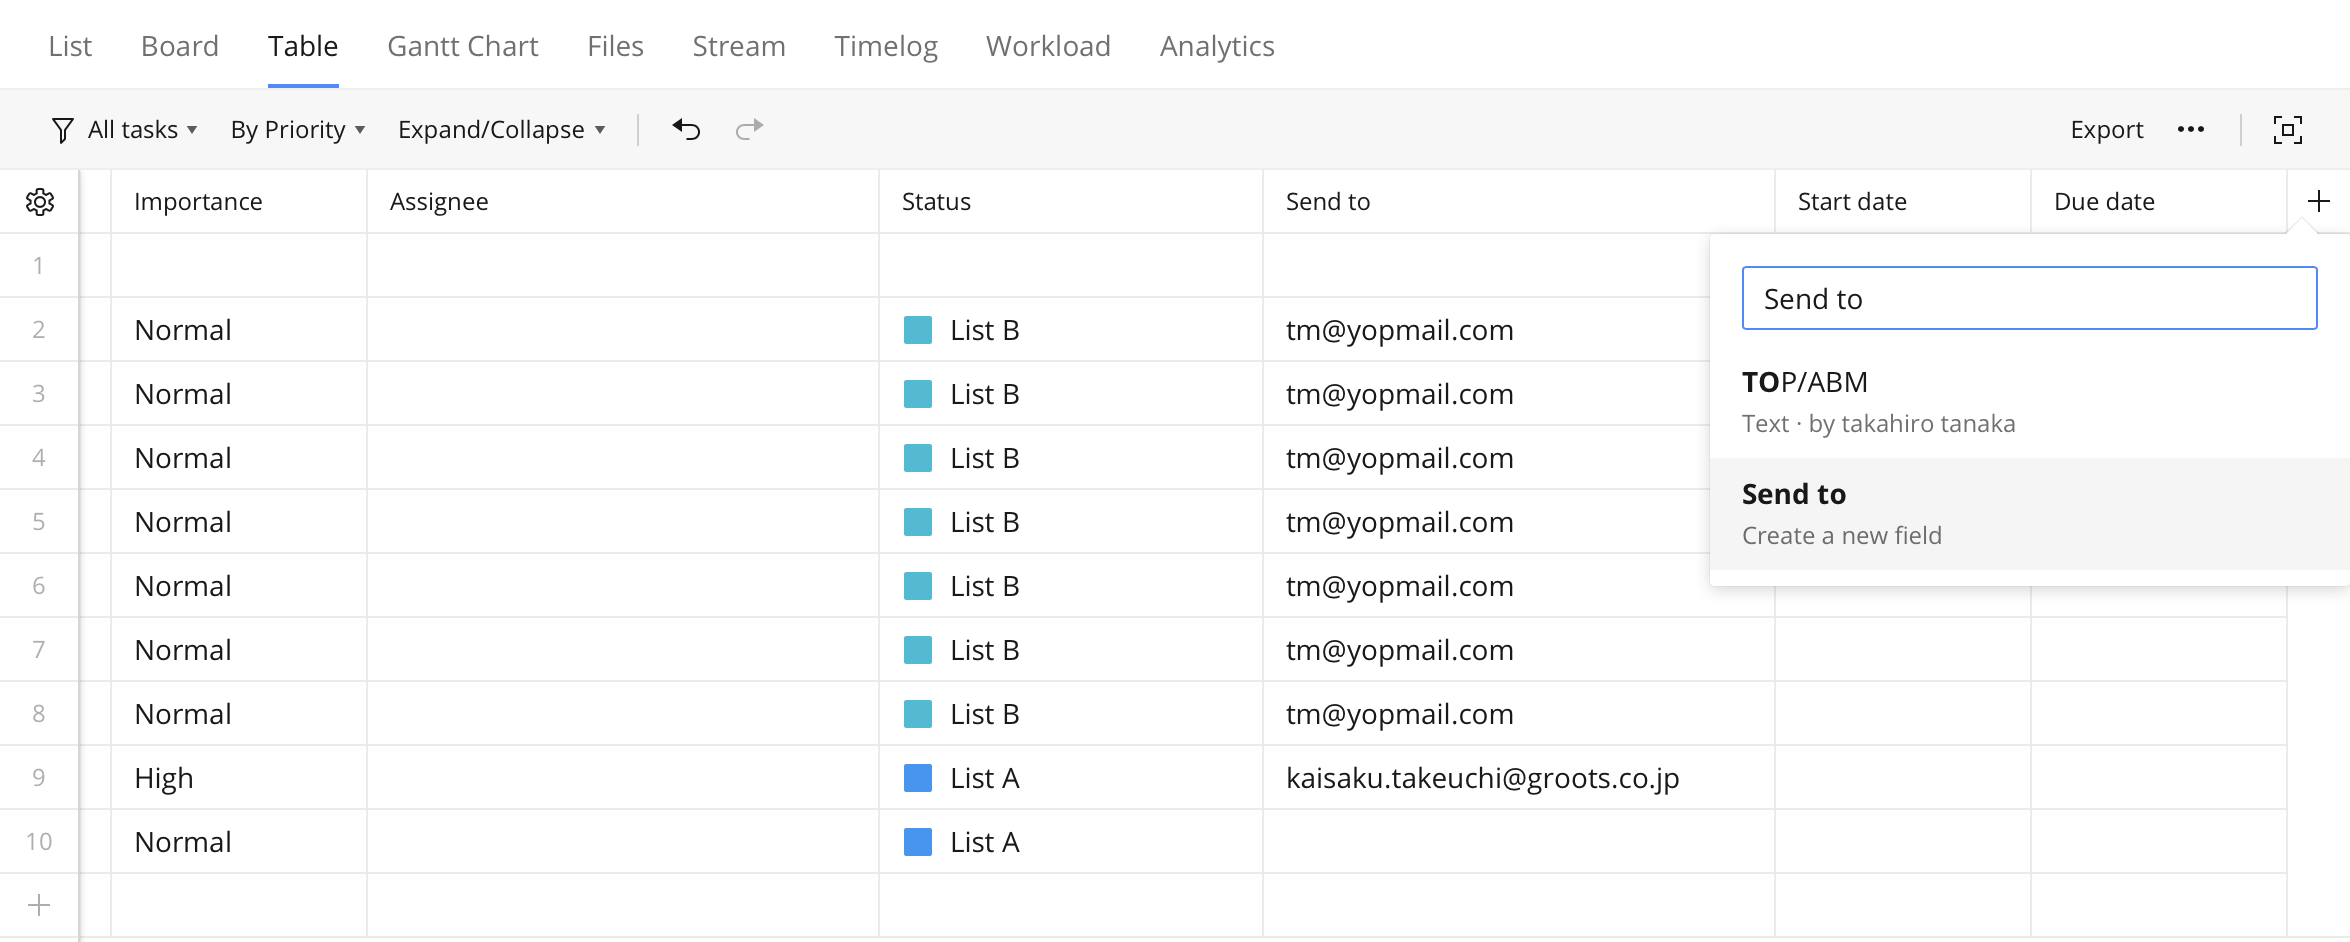
Adding custom fields and using in your task table
Connector SDK
A custom connector defines some predefined named blocks of objects, for example,
connection: { … }
There are EIGHT defined blocks as we see below. Not all the blocks are required, but some are.


Connector SDK skeleton
- title – Optionally you can assign a name to your connector matching the title you’ve given to it on the SDK homepage.
- connection – This block defines the connection auth configurations. And user input fields that are shown to the end user when they want to link your connector. Authentication supports basic OAuth 2.0 natively as well as a custom authentication that allows you to connect to most other authentication types like digest and multi step authentication procedures.
- test – This is where you can define a test to ensure that your connection is valid. When a user attempts to configure a connection on your connector, this test is executed to verify whether a connection has successfully been made.
- actions – This is where you define actions that are available to users using your connector. You’ll be able to define input fields for users to fill up, the exact mechanics of how the action handles data and the output fields(datapills) of the action so that users can select these outputs for use in later steps.
- triggers – This is where you define triggers that people can use with your custom connector. Triggers kick start recipes and can either be implemented via polling (checking every few minutes) or webhooks (static or dynamic). Similar to actions, you’ll be able to define user input fields, the mechanics behind how the trigger is executed and the output fields(datapills) of the trigger. Our triggers also provide closure maintenance and pagination capabilities, allowing you to design for users with heavy use cases.
- object_definitions – This is where you can define commonly used input or output fields and reference them later on in your actions and triggers to reduce the amount of redundant code that you might have in your SDK. Object definitions are also able to make HTTP calls – allowing you to access metadata endpoints whenever possible to generate dynamic input and output fields.
- picklists – This is where you can define lists of values. Reference them later on when you define input fields that are dropdowns instead of free text fields. Picklists can be static, dynamic based on API requests or even dependent on the previous input of the user.
- methods – This is where you can define functions in the same way that you would do in normal coding. Methods can be called and then used in most portions of your connector code.
Email Notifier Custom connector
Now in our case, the purpose of our custom connector is to check in which state a task is in it’s workflow, and whether the email associated with the task is a valid email address, and output a simple yes or no indicating whether to send an email notification or not.
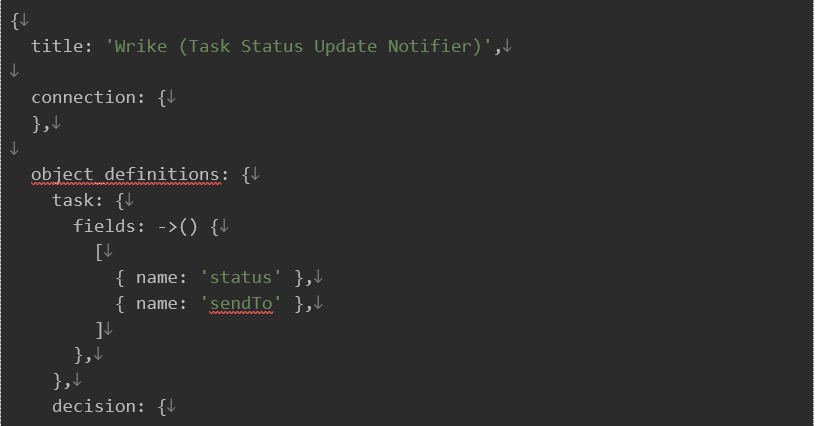
In our case we primarily used two objects – object_definitions and actions. We did not use any authentication mechanism and users of our connector do not need to give any initial params – so, our connection object is an empty object – {}. So, here we will learn the basic structure of an object_definitions object and an actions object.
In object_definitions you define the data models you are going to use in your actions. We have defined two data models, task and decision. Notice the object model definition syntax. For the task data model we need status and sendTo data. For the decision model we have only defined a boolean shouldSend attribute. Notice how we defined the data type for the shouldSend attribute.
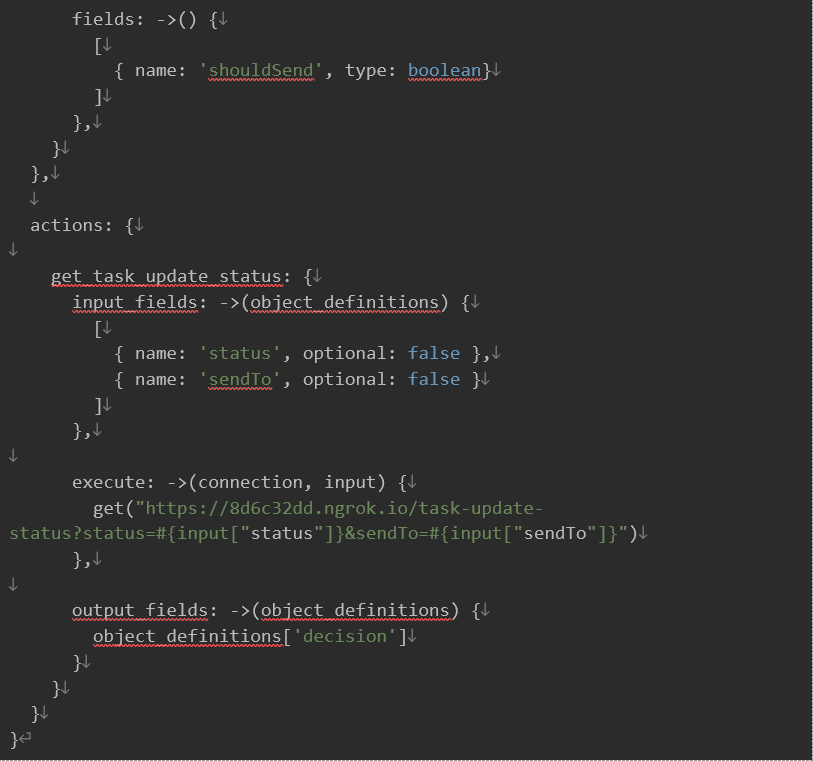
Then we defined the actions block. We defined one action get_task_update_status. It has three sub-blocks.
- input_fields – when you connect the recipe, workato makes these fields available for input in the recipe UI.
- execute is the block which executes to generate the desired output. Generally you call an API to your backend to get the output / data.
- Then we defined the output_fields block, where we mapped our previously defined decision object to the API response object – Our API returns {shouldSend}.
This is a very basic custom connector, just to kickoff with a simple project. After you have written your custom connector source code, you can test and debug the connector Workato connector code page. When everything is ready you can release the latest version of your source code.
Email notifier custom connector
Email notifier recipe
Once you’ve released your source code, you can now use that connector along with other connector apps in a recipe. Using the custom connector we’ve just built is pretty straightforward.

Email notifier recipe
While setting up the Wrike (task status update notifier) set the status field to New/updated task > Custom status > Name and the Send to field to New/updated task > Custom fields > Send to.

Wrike (task update notifier) connector
Then we need to add a condition block to check the output of our custom connector, to know whether we are going to send the email or not. We check the Data field Should send if is true, and send the email with the sendgrid connector.
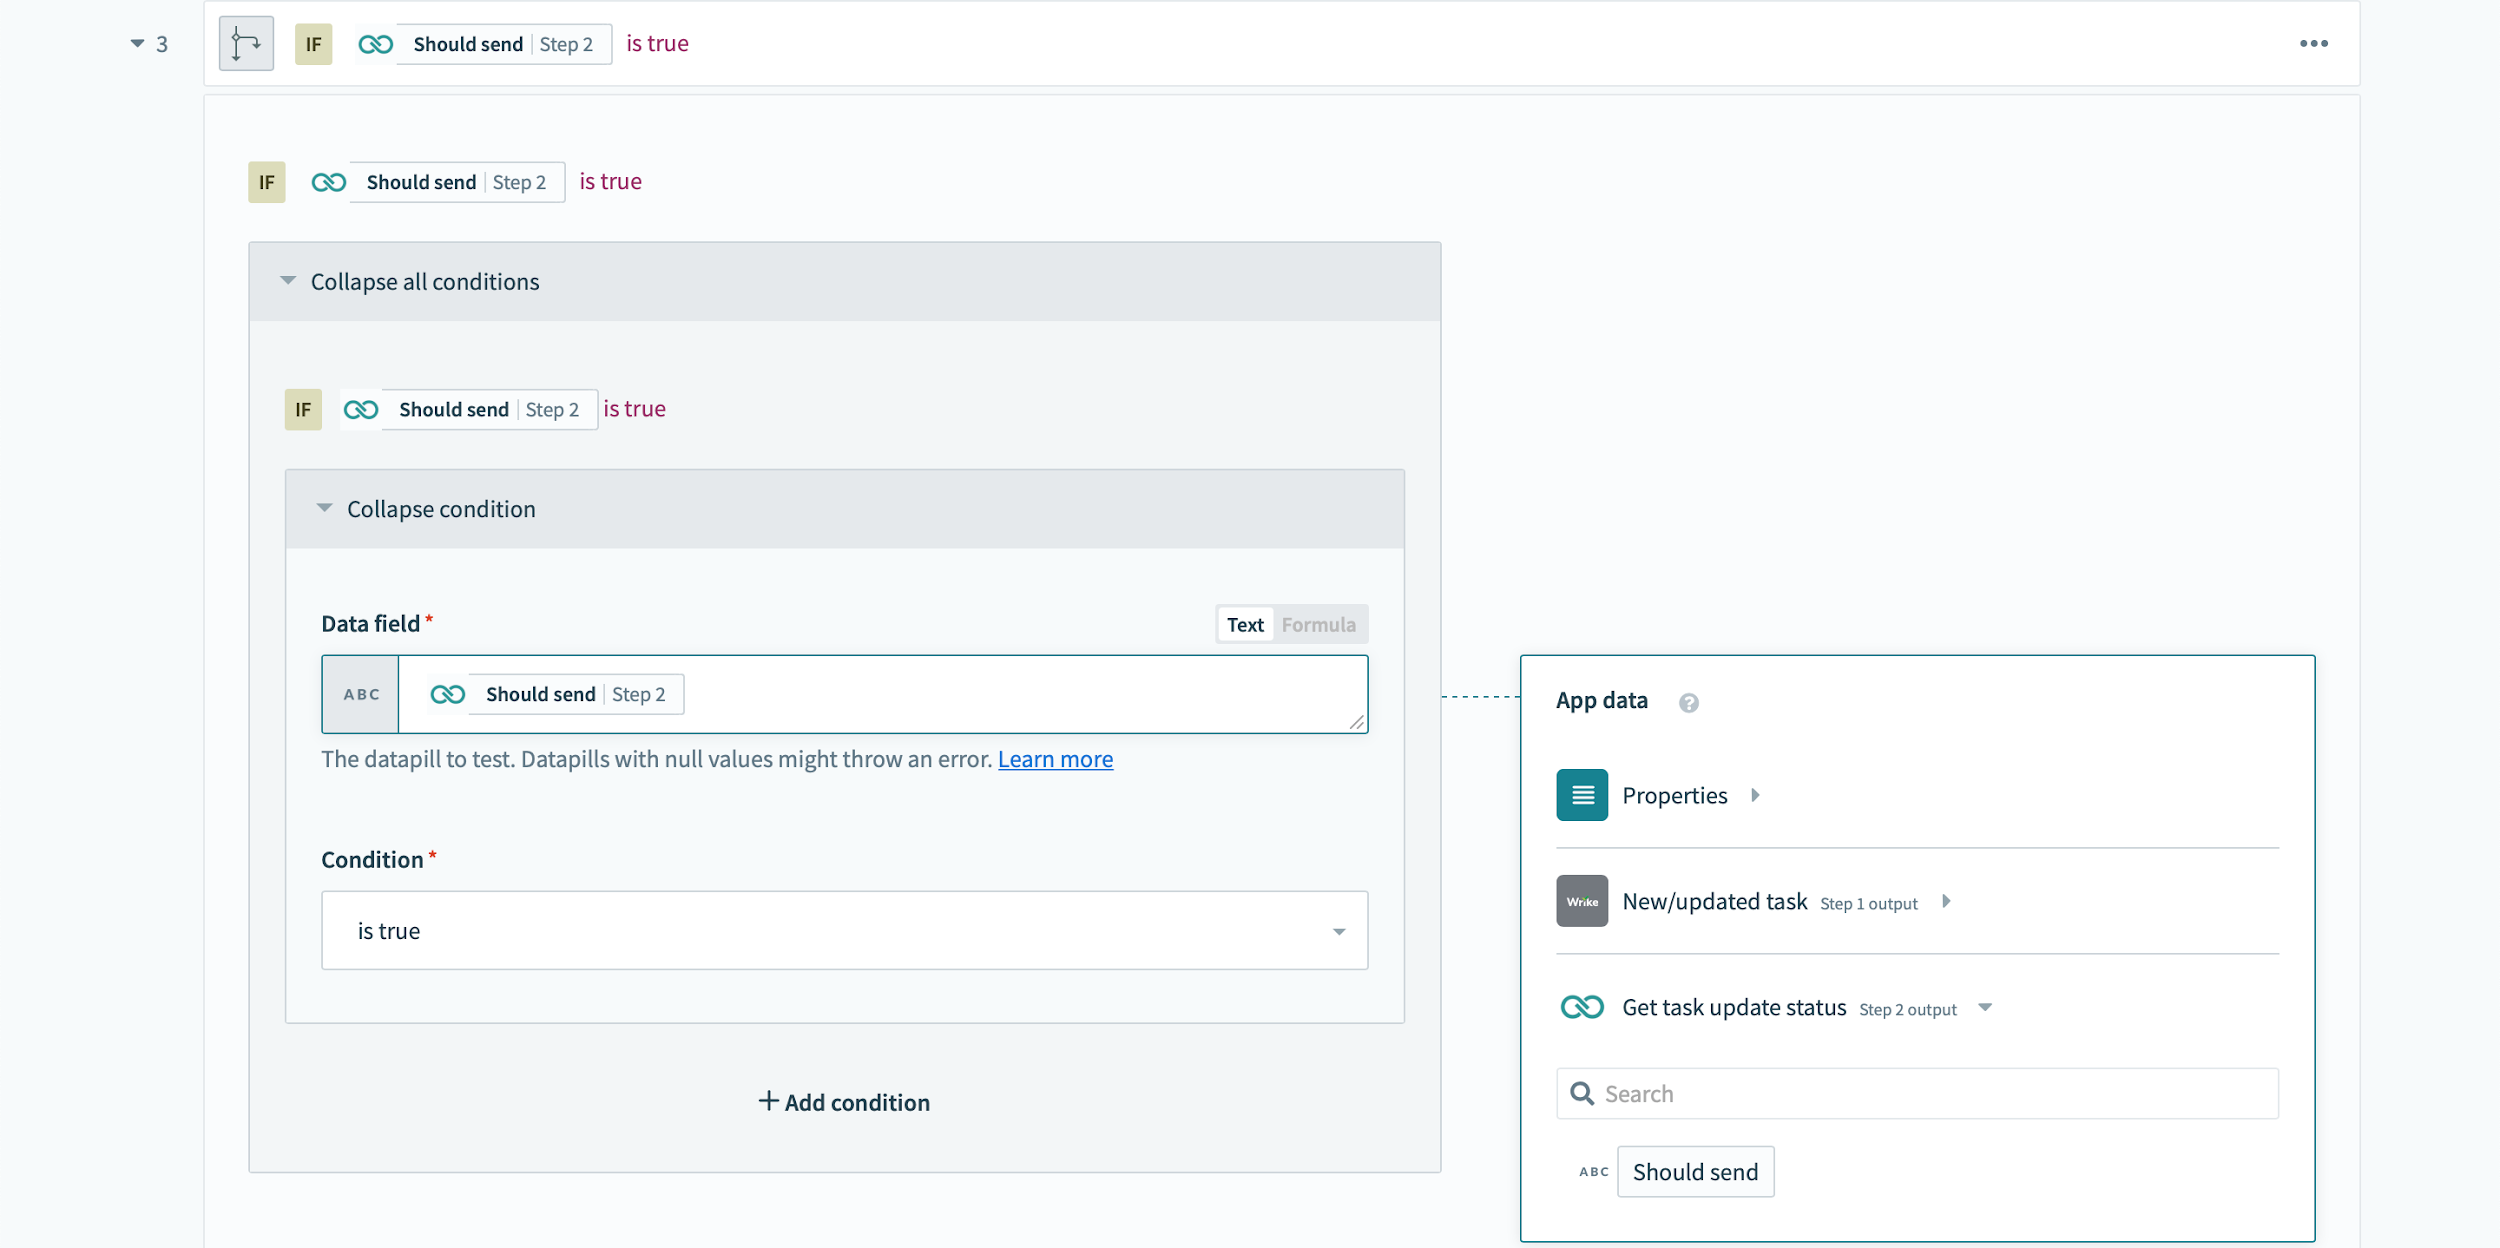
Wrike (task update notifier) connector if condition
That’s it. You’ve just built your first custom connector and used it in a recipe. Congratulations and happy learning!
Wrike bot with Dialogflow
Our next project with Wrike has been a Dialogflow chatbot for Wrike – managing the wrike tasks. The purpose of our project is to see if we can build an efficient enough chatbot for Wrike, specifically to use in our Slack workspace, to manage our Wrike tasks – create, assign, update, find, move etc.
We did not have enough prior experience with Dialogflow. So we did our homework on the Dialogflow UI, functionalities, API and webhooks. As we moved on, we used Dialogflow webhook notifications to trigger our actions on Wrike from our backend server.
The Dialogflow NLU platform
The first thing to understand about an NLU (natural language understanding) platform is conceptual – the intent of a dialog. Imagine you are having a conversational dialog with someone else, the first thing you might want to do is greet the person before you move onto your main intention. So you have the intention to welcome the person who is on the other side of the conversation. In dialogflow, for each of such intent of an user, that the subject Dialogflow chatbot is going to be a service for, we declare/create an Intent in our Dialogflow agent.
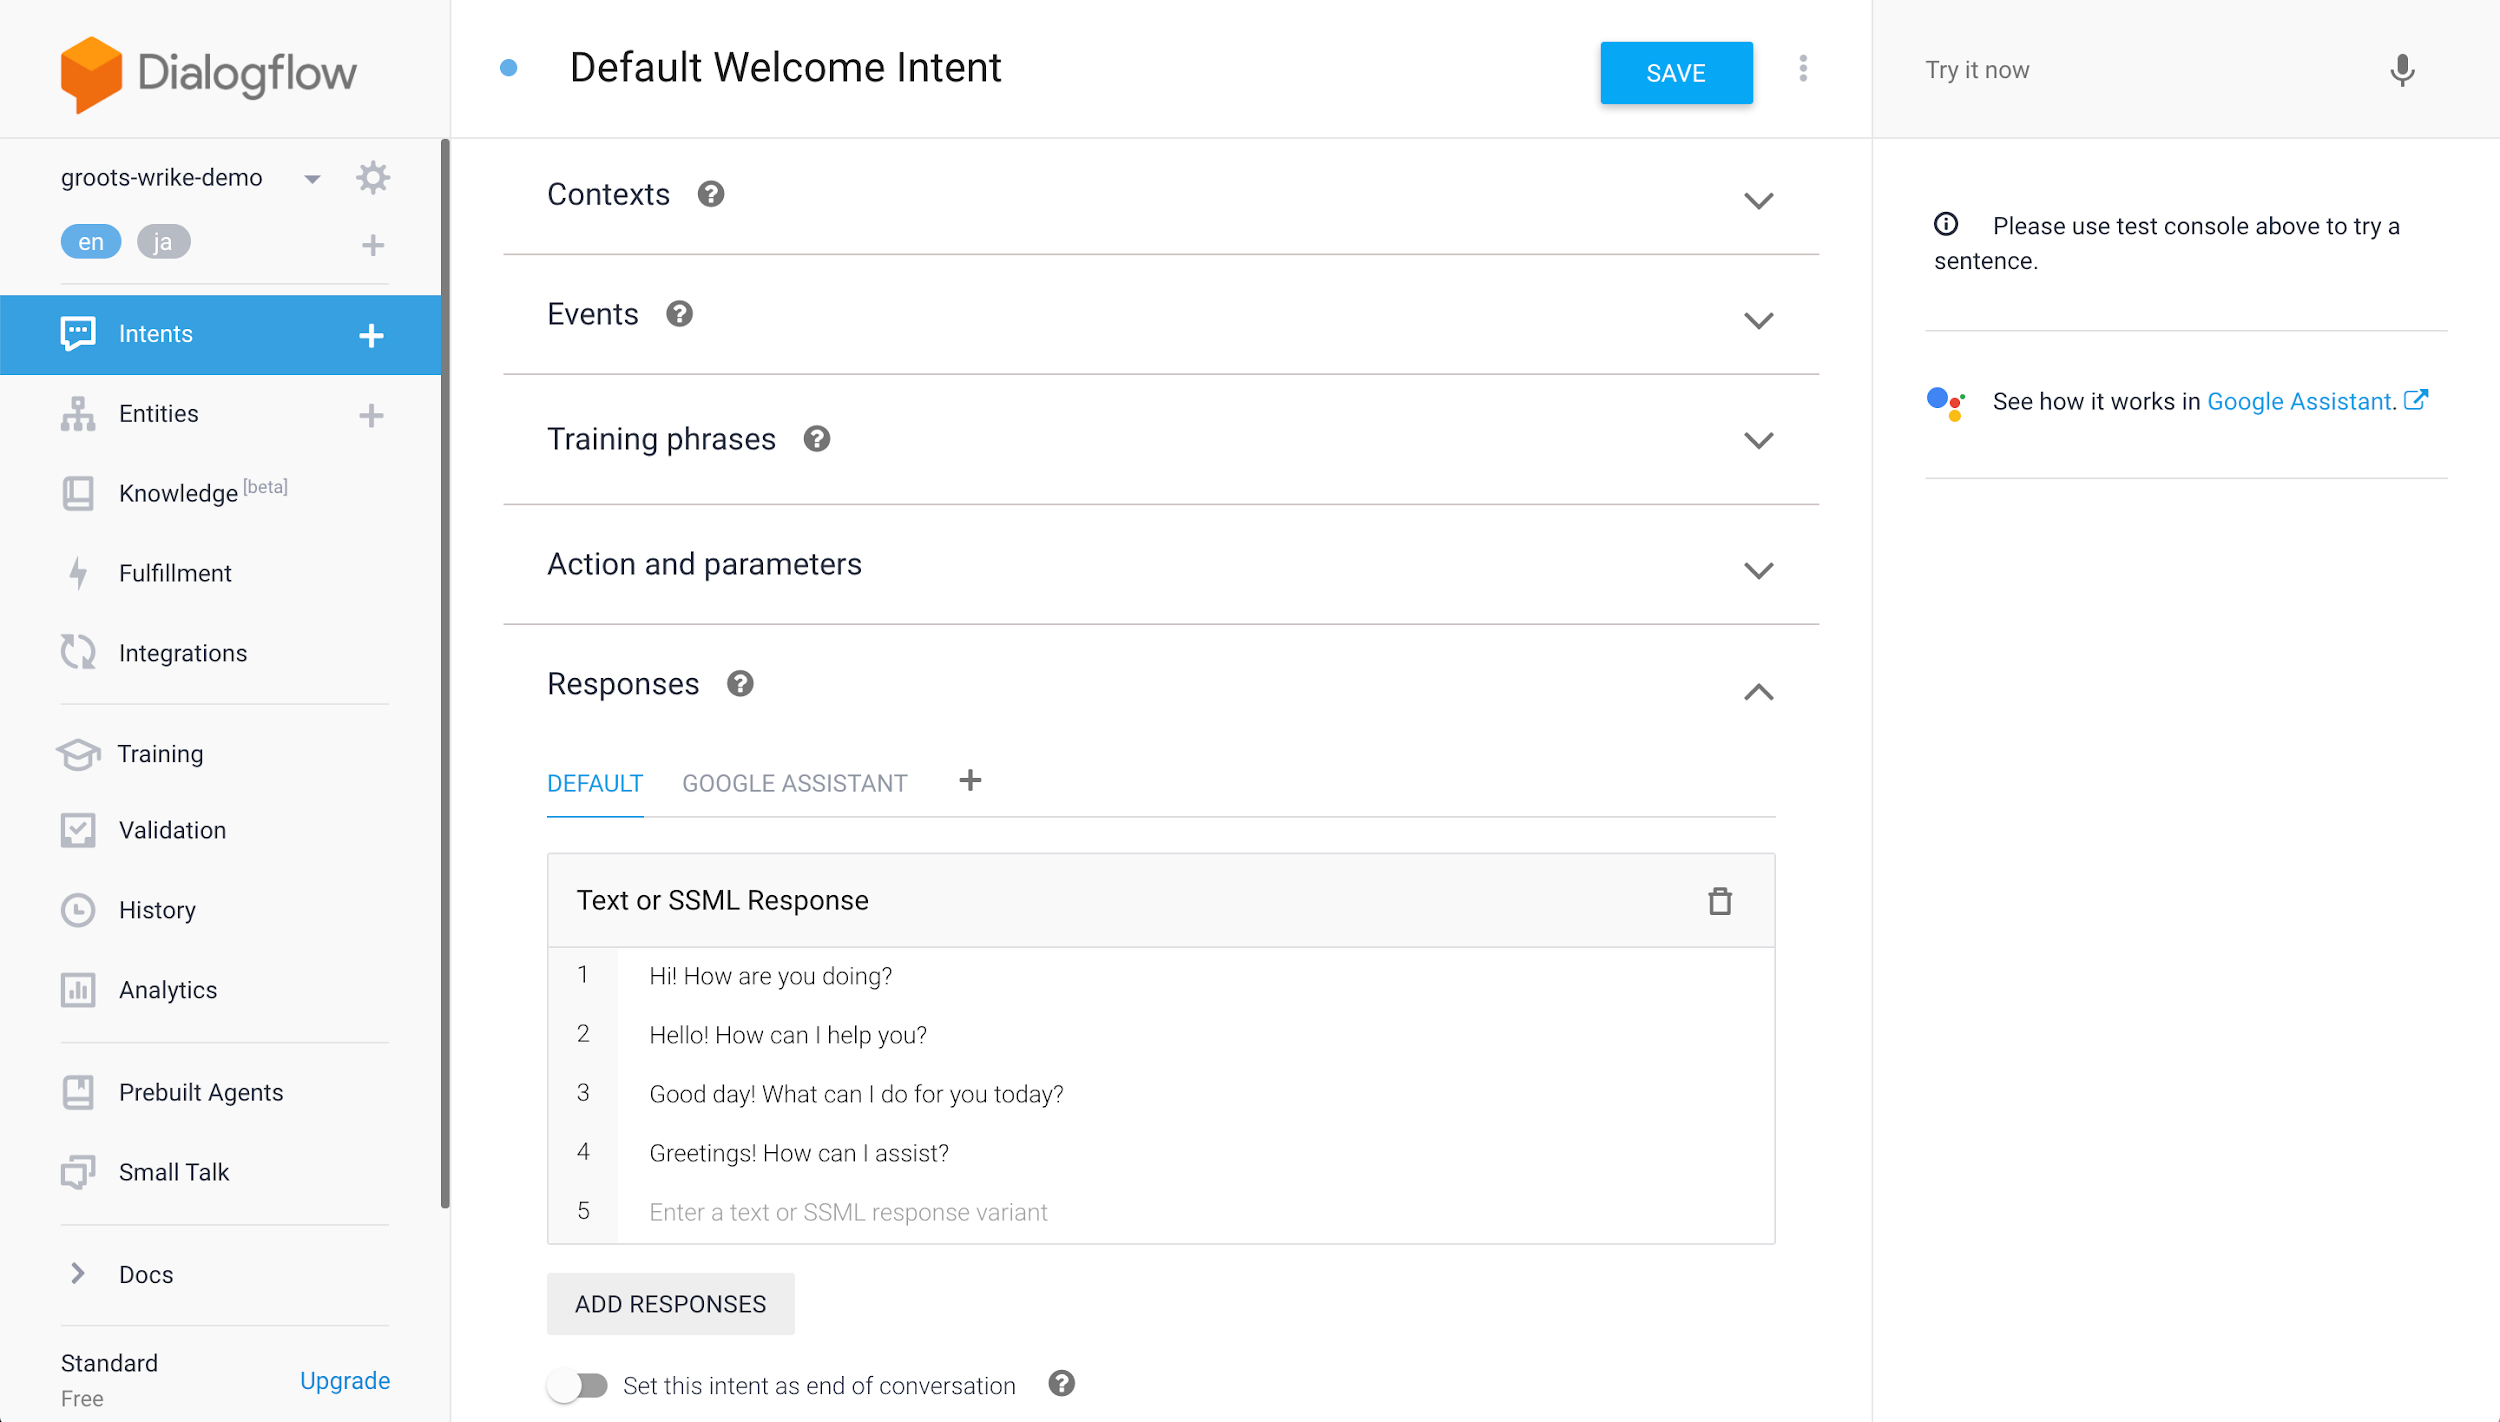
The (default) Welcome intent
Anatomy of an intent
To call the intent, every intent has a name. After that the two main parts of an intent in Dialogflow are Training Phrases and Responses. There are several other parts of an intent that we are going to talk about as we progress.
Training Phrases
In expressing an intent, it can be said in any language human talk, and there may be a thousand ways to express that intent in any given language. That is the most challenging part of an NLU engine. In Intent Training Phrases, we enlist quite a few ways the subject intent can be expressed. But it is not possible to enlist all the different possibilities which is possibly infinity! Here comes the NLU engine that is behind the Dialogflow platform. Dialogflow can start from a few user defined training phrases, and learn many more ways an intent can be expressed as it listens to more and more expressions from users.
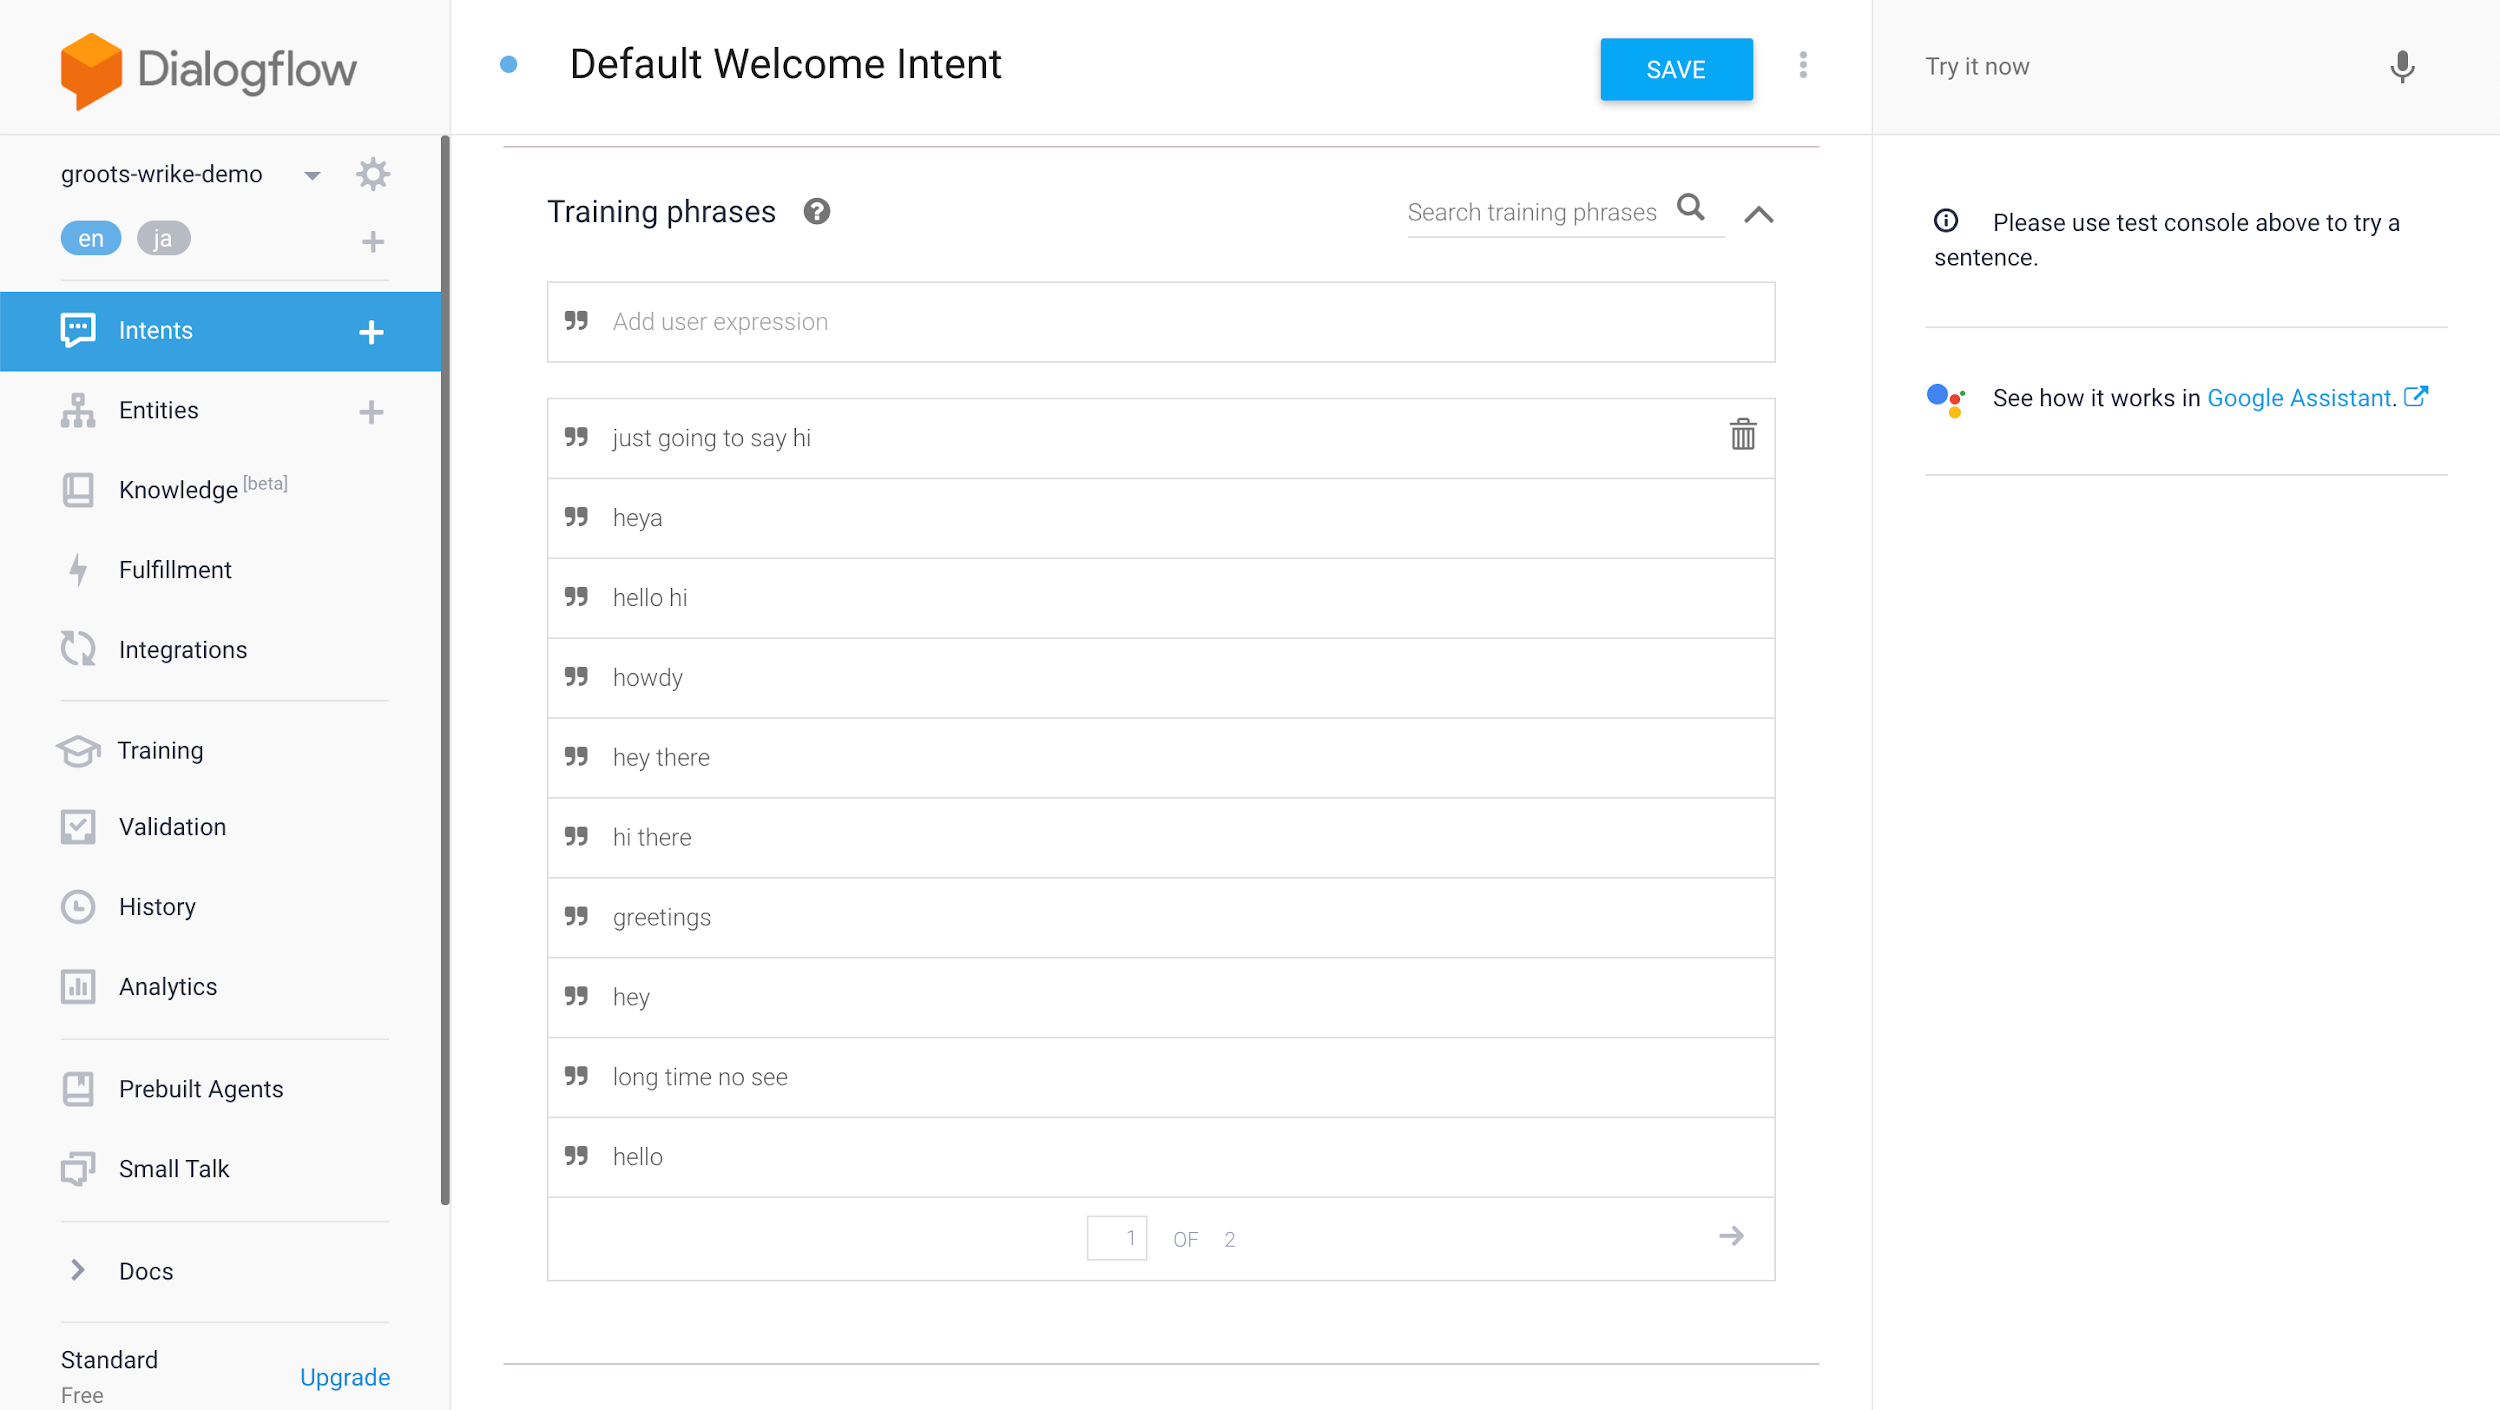
Our training phrases in Default Welcome Intent
Responses
Responses are pretty straightforward. You can define a combination of many dialogs that the agent will randomly choose from. You can also define multiple response dialogs for an intent. You can define responses in simple text or as custom payload. Custom payload is JSON in the format that is required by the client messenger the chatbot agent may reside on. A client can present not only text, but also images, cards, list, so on and so forth in a conversation with a user. This is one unique positive part of conversation with a chatbot.
Parameters
Parameters play a crucial part of a conversation to pick values for customers’ intent. Each parameter has a type, which is called the Entity type. You can define your own types, called entities. For example, you want to purchase a pizza, and you want to express the size and type of pizza, the different types of toppings with the pizza, so on and so forth. The bot can naturally match the params from your dialog – “I want to have a 12 inch Italian pizza”. So the intent is to buy a pizza, and the entities are size 12 inch and type Italian. Entities can be required or optional. For example, you may or may not want to have extra toppings with the pizza. In dialogflow assigning values to params is called slot filling.
Contexts
Contexts simply allow your agent to remember the context of a dialog in a multi dialog conversation that is designed through multiple intents. For example, a customer says “Do not choose a due date”. Obviously it’s a dialog in the middle of a multi dialog conversation, and a bot needs to remember the context to answer that.
Using context you can control the flow of conversation. There are input context and output context for an intent, which are unique string names. When you want to control the flow of a conversation, you set the input context of a next intent through which you want a conversation to flow through from a previous intent where you set the same context as the output context.
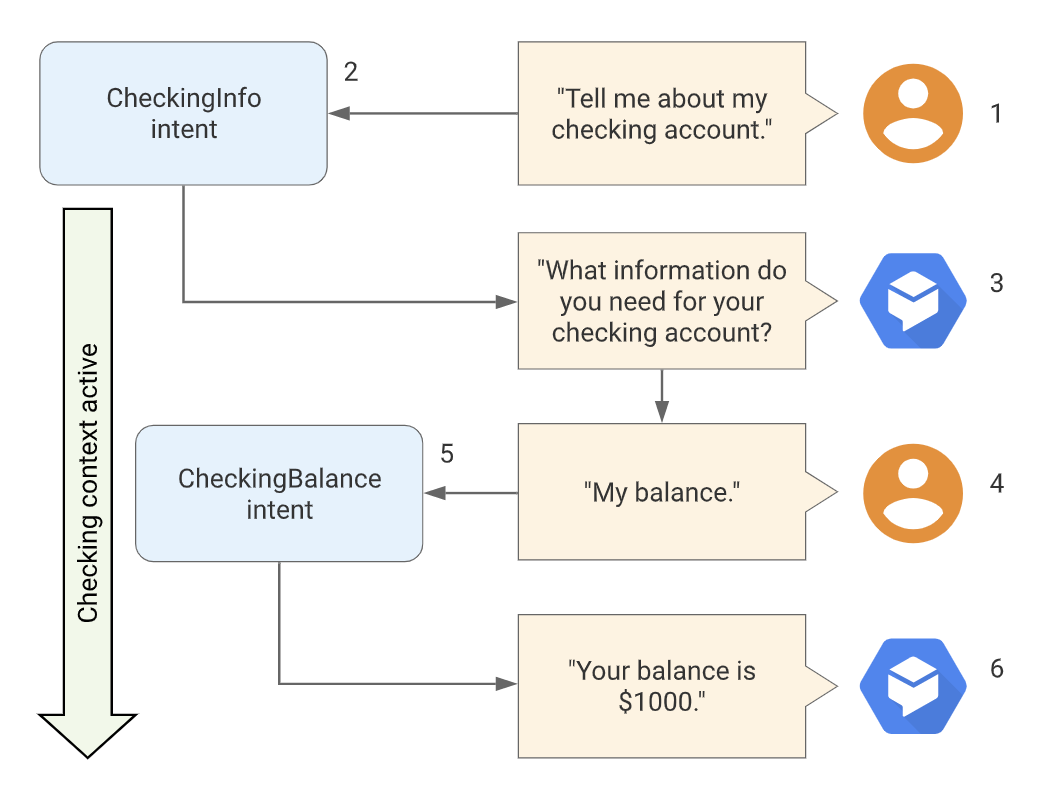
Context of a conversation
Fulfillment
Fulfillment allows you to listen to the active intent trigger from your backend server as a user conversation flows. When an intent requires some action by your system, for instance sending an email, or a dynamic response, for instance your bank account balance, you set enable fulfillment for that intent. You can validate the input params by the backend server and manipulate the contexts through webhook response.
Entity
An entity is anything that serves the intent of the user. For example, if a user says, I want to find a tv show that is fun and romantic. So the entities here the agent is going to serve is maybe a list of tv shows that are tagged fun and romantic, from which the user can choose one.
Followup intent
Followup intent allows you to set pairs of output and input contexts automatically. A followup intent is matched only after it’s parent intent was matched. So, followup intents allow you to design a multi dialog conversation keeping the context of the user’s conversation.
Linear and nonlinear dialog
In contrast to a linear dialog, a nonlinear dialog flow depends on a user’s choice. Dialogflow allows you to design predefined linear or nonlinear dialog using intent parameters, followup contexts and user input text or speech matching.
Intent matching
Dialogflow uses two algorithms to match intents: rule-based grammar matching and ML matching. Dialogflow simultaneously attempts both algorithms and chooses the best result.
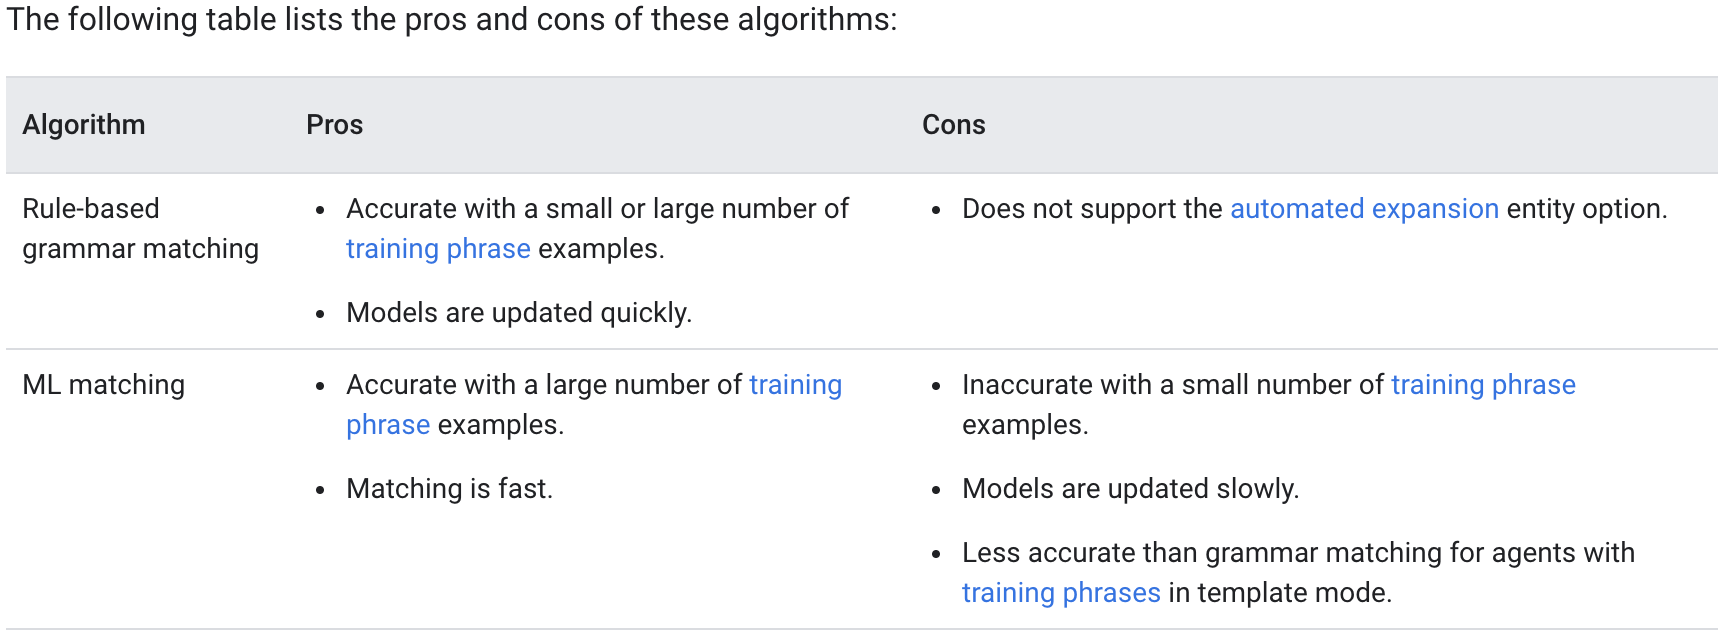
If no intents meet a threshold, a fallback intent is matched, if there is one.
Language support
Dialogflow supports a range of many languages natively which includes Japanese, Spanish, German and more. For each intent you have for your agent, you can specify a localized set of phrases and responses for given language. Which is pretty nice to have.
Webhook
Dialogflow webhook allows you to take actions on users instructions. You can enable webhook calls for specific intents for which you need specific action to be taken. In our case, for example, Wrike Task Create intent. On the webhook event you can listen to the intent trigger from your server and create the task in the Wrike workspace from your server through Wrike API.
Integrations
The most fun part about Dialogflow is it’s seamless integration options on many different messaging platforms. You can Go to your agent’s Integrations page and follow the instructions there to integrate your chatbot in that platform. Having these integration options allows you to have the same chatbot experience across all the different platforms your users are going to be.
Our Wrike chatbot on Dialogflow
Our main goal was to create and manage Wrike tasks from our slack workspace. And it was very successful. We were able to go through a conversation with the dialogflow chatbot and the agent can create a task with all the many optionals we did choose or not through a nonlinear dialog. We used webhook fulfillment triggers for intent that we want to do an action against on Wrike.
Webhook responses
To listen to webhook intended events, just like previously you can use ngrok to expose your development server url and subscribe your url to webhook events form your agent’s fulfillment page.
If you want to customize your intent’s default response text, it is as simple as below:
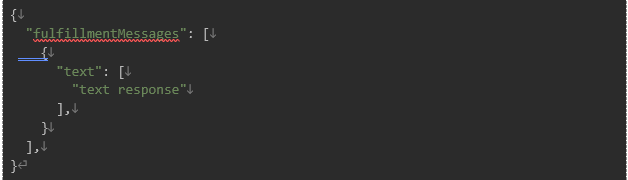
Responding with custom text through webhook response
Our Wrike chatbot features (V1)
Our Wrike bot is able to
- Create a task in project / folder
- with optional
- status
- assignee
- due-date
- and description
- Find a task and it’s detail
- Get tasks of
- assignee
- with status
- Move a task in your custom workflow (in any project)
- with optional
We are going to use Wrike bot for dailly official purposes and gradually improve it to do better and more. We think you will greatly enjoy and benefit from a Dialogflow chatbot for your business tool automation.
We wish Dialogflow had
Dialogflow interface is very intuitive for both beginners and professionals. But it’s navigation is very clumsy and time consuming. Also it’s continuous loading while navigating makes it almost impossible to make all the time spent worthwhile. We wish Google will bring a much more interactive easy to navigate UI experience for Dialogflow soon.
Conclusion
Wrike is a great workflow tool. It has great API design – a very powerful set of methods for you to create sophisticated workflow applications. But regarding webhooks and the Workato connector I believe Wrike is going to do what’s needed to make them the same level as it’s APIs.
Our research on Warkoto was a great experience. Its concepts are very clear and concise and very well documented. And a very powerful tool for you to keep under your belt!
And you can make a great chatbot with Dialoflow for your workflow platform. Dialogflow NLU is pretty impressive. The simplicity of dialogflow concepts – intent and entity – makes it an extremely easy but powerful tool to design human-like conversation flow.